Thank you for purchasing our script. If you have any questions that are beyond the scope of this help file, please feel free to contact us via
our help desk. This is an online help desk for Varient. You can create your free
account and use the system. Thanks so much!
Introduction
Varient is a multi-purpose news & magazine script. It has clean, responsive and
user-friendly design. You can manage almost everything in your site with its powerful Admin panel.
It is multi-author system and all authors have their own panel to manage their posts, videos and audios. It is
secured, SEO optimized, fast and easy to use.
The technologies used:
PHP CodeIgniter 4 Web Framework
HTML 5
CSS (Bootstrap)
JQUERY
AJAX
Key Features:
Clean and Responsive Design
Built Using Bootstrap
Totally Secure System
Multilingual System (New Language Can be Added Easily)
RTL Support
SEO Optimized
SEO-Friendly URLs
Layout Options (Light and Dark Mode)
Unlimited Layout Colors
Editable & Sortable Navigation (With Mega Menu)
External Link & Dropdown Options for Navigation
Responsive & Sortable Slider
Responsive Ad Spaces for Any Kind of Ad Codes (Including Google AdSense)
Create Ad Codes
Author Reward System
Progressive Web App (PWA) Support
AWS S3 Integration
Structured Data (JSON-LD)
Adding Unlimited Fully Editable Pages
Show & Hide Options for Page, Page Title, Page Breadcrumb, Page Right Column
Gallery Page (Enable & Disable Option)
Gallery Albums and Categories
Add, Delete Photos
Contact Page (With Google Map)
Search in Site
Reading List Page (Add & Remove from List)
Featured Posts
News Ticker
Emoji Reactions
Add, Delete, Update Posts
Bulk Post Upload System
Article, Gallery, Ordered List, Trivia Quiz, Personality Quiz, Video and Audio Post Formats
Scheduled Posts
Pending Posts
Drafts
Downloadable Files (DOC, ZIP, PDF..) for Posts
Add Multiple Images to a Post
GIF Support
Add, Delete, Update Categories
Newsletter (Send Html Email to All Registered Emails)
Manage Subscribers
Lazy Image Loading
Dynamic Tag System
Voting Poll (Add, Delete Unlimited Poll)
Social Login (Facebook, Google and VKontakte)
Social Sharing
Social Media Links
Sidebar Widgets (Add, Delete, Update Widgets)
Widget: Popular Posts
Widget: Recommended Posts
Widget: Random Posts Slider
Widget: Tags
Widget: Voting Poll
Page view Counts (Enable & Disable Option)
Ajax Comment System
Facebook Comments
Comment Approval System
Manage Comments
Manage Contact Messages
Advanced Post Options
Database Cache System
Roles & Permissions System
Follow & Unfollow Users
Email Verification
Sitemap.xml Generator
RSS Aggregator System (Auto Update with Cron Job) (Doesn't support full-text RSS)
RSS Feeds (With Different Channels)
Font Settings (New Google Fonts Can be Added Easily)
Route Settings (Static Routes can be Edited)
Maintenance Mode
Rich Text Editor (Image and Video Can Be Added)
Membership System with 4 Roles (Admin, Moderator, Author, User)
Manage Registered Users
Ban User Accounts
Change User Role
Admin & Author Profile Page
Enable & Disable Membership System
Enable & Disable Comment System
Secure Authentication
Password Reset
Google Analytics
Advanced Settings Options
Visual Settings
Change Logo, Favicon, Site Title, Site Description, etc. from Admin Panel
Easy Installation Using Installation Wizard
Detailed Documentation
Runs on PHP 7.4 and Higher Versions
Security:
Varient is a secure system. There are various mechanisms to secure application. These mechanisms are:
Cross-Site Request Forgery (CSRF) Prevention
Cross-Site Scripting (XSS) Prevention
Password Hashing
Avoiding SQL Injection
Requirements:
There are some requirements for Varient to work on your server. These requirements are:
PHP >= 7.4+
cURL PHP Extension
Fileinfo PHP Extension
Exif PHP Extension
Mbstring PHP Extension
Files
a) CSS Files
AdminLTE.min.css and _all-skins.min.css: Contains general css codes for admin panel.
custom.js: Contains custom script codes. There are custom functions and ajax post functions
jquery.cookie.js: JavaScript library for handling cookies
script.js: Contains javascript functions for front-end.
Js files are separated into sections using:
//ajax post delete image
code
//datatable function
code
etc, etc.
c) Plugins
Plugins used in application:
jQuery
jQuery is a Javascript library that greatly reduces the amount of code that you must write.
jQueryUI
jQuery UI is a curated set of user interface interactions, effects, widgets, and themes built on top of the
jQuery JavaScript Library.
TinyMCE
TinyMCE is a browser-based WYSIWYG content editor.
Datatables
DataTables is a plug-in for the jQuery Javascript library. It is a highly flexible tool, based upon the
foundations of progressive enhancement, and will add
advanced interaction controls to any HTML table.
ICheck
Highly customizable checkboxes and radio buttons.
Pace
Automatic page load progress bar.
Tagsinput
jQuery plugin providing a Twitter Bootstrap user interface for managing tags
News Ticker
Jquery news ticker plugin
Magnific Popup
Jquery Gallery plugin
Owl-Carousel
Responsive jquery slider plugin
Jquery-confirm
Jquery-confirm plugin
Masonry-filter
Jquery gallery plugin
Installation
Check your PHP version before start installation. Your PHP version should be 7.4 or a higher version.
cURL PHP extension should be enabled on your server. If you get "cURL is not available on your server! Please enable cURL to continue the installation"
error during installation, you need to enable cURL on your server.
You can enable it by adding extension=php_curl.dll line to your php.ini file. If you cannot access your php.ini file, please contact your hosting provider.
License Code
You need a license code to install the script. You can create this license code with your domain name and Envato purchase code.
Go to our help desk ( https://codingest.net/) and create your account on this system. Then generate your license code from the Licenses section (https://codingest.net/licenses).
If you want to change your domain name in the future, you can change it with the "Change Domain" option.
You can install the script by watching this video.
Or you can follow these steps to install the script:
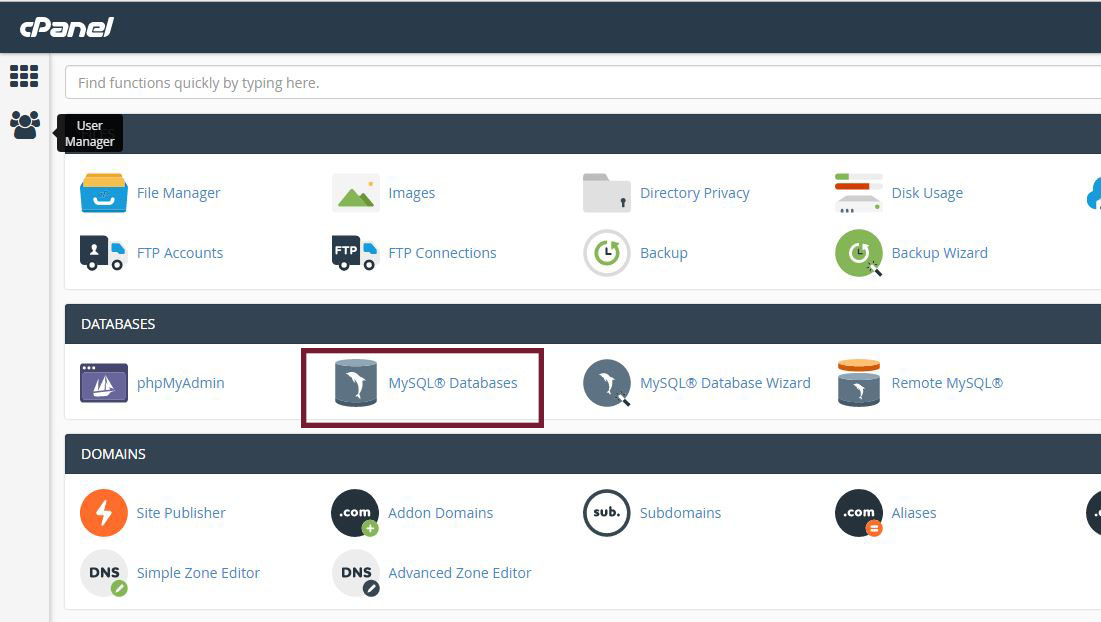
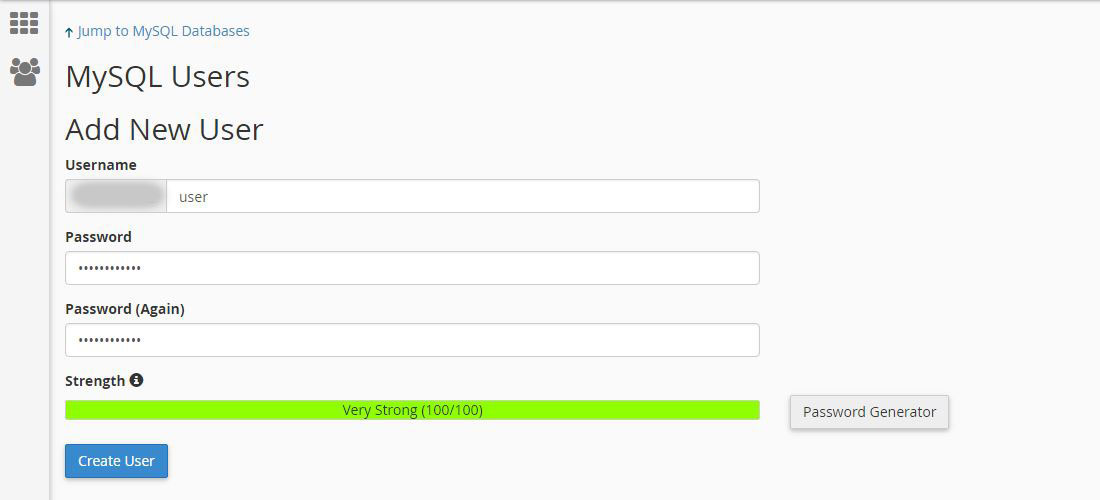
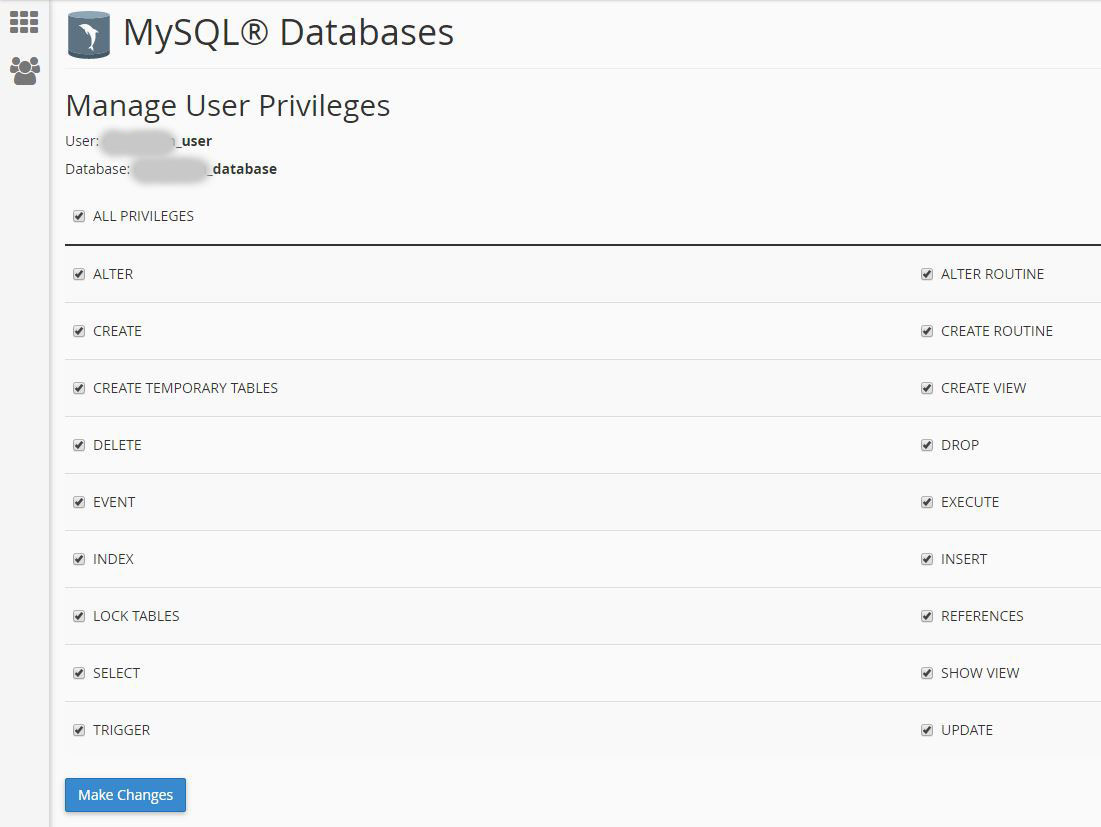
1. Create a new Database with user that has all permissions.
Go to cPanel and Click MySQL® Databases
Create New Database
Add New User
Add User To Database
Set User Permissions
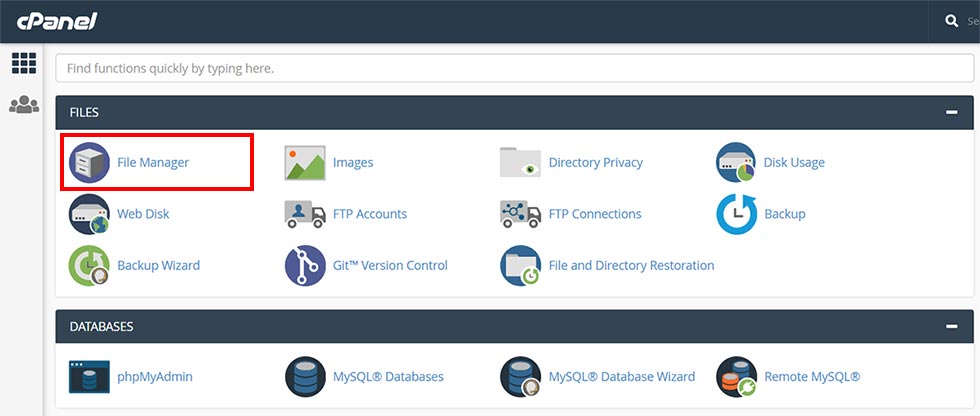
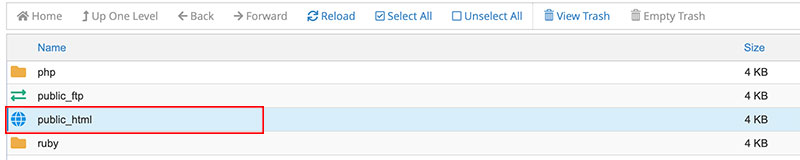
2. Upload script files to your hosting (FTP).
Open your cPanel and go to File Manager section.
Go to main directory of your site. Most of the time this folder will be "public_html".
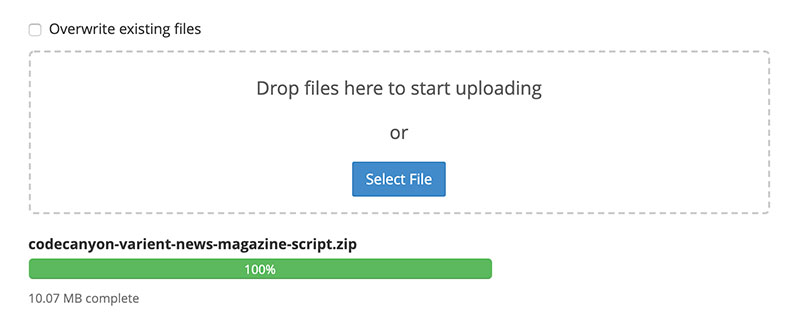
Open this folder and upload codecanyon-varient-news-magazine-script.zip file to this folder.
Rigth click the .zip file and select Extract option.
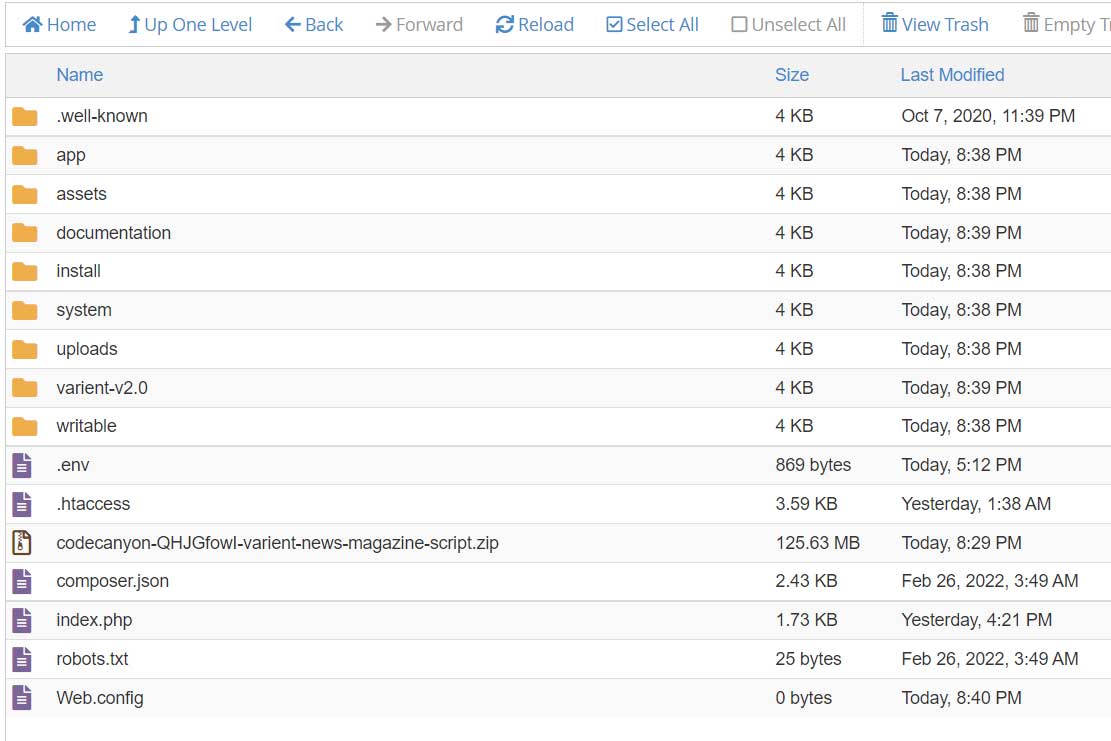
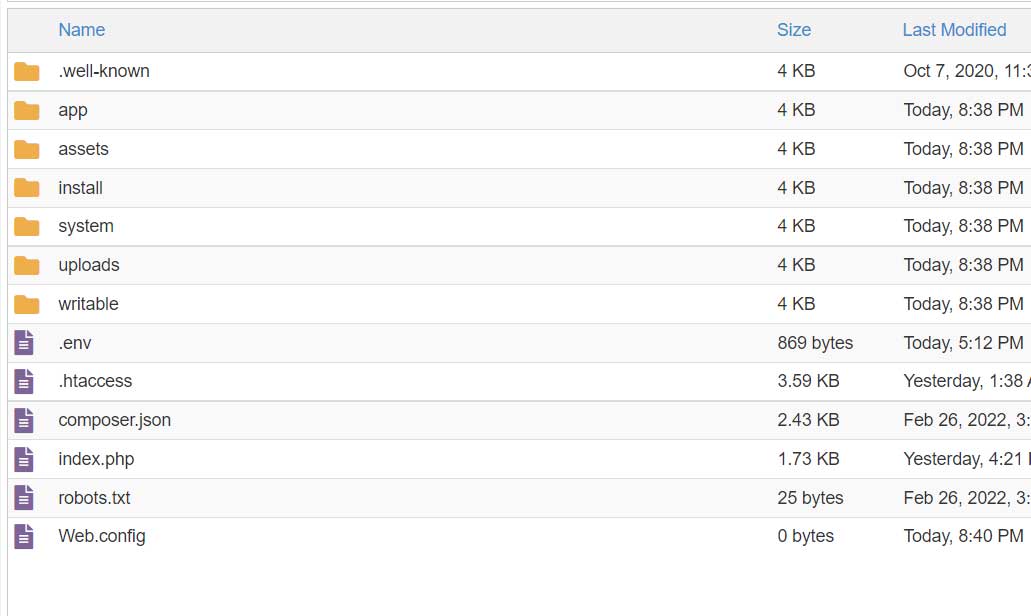
Move all files that in the "varient-v.." folder to main directory.
Delete unnecessary files/folders: "documentation", "varient-v.." and "codecanyon-varient-news-magazine-script.zip".
Make sure that the .htaccess file exists in this directory. If you cannot see it, click Settings button at the top right corner and select Show Hidden Files (dotfiles) option.
Also, cPanel can automatically change the content of this file. Please open this file and make sure the content of this file is like .htaccess below.
If you are using NGINX server, .htaccess will not work on your server. In this case, you need to make these settings on your server: NGINX configuration for CodeIgniter
3. You will see this page after uploading all files to your FTP. Click "Install" to proceed.
If you cannot see this page, you can access install page by entering this link to your browser address bar: http://yourdomain.com/install
4. Click "Go to Help Desk" button and generate your license code if you don't have a license code. Enter your license code and then click Next.
5. Check system requirements. If one of these extensions is not enabled, you must enable it from your server settings. If all requirements are provided, click Next.
6. Check folder permissions. If all folders are writable, click Next.
7. Enter your database credentials. Click next.
If you want to change your database credentials later, you can edit the app/Config/Database.php file.
8. Enter your site URL, admin credentials and your Timezone and click finish. Site URL is your complete site address. Some examples:
Installing to Main directory: https://abc.com
Installing to subdomain: https://test.abc.com
Installing to folder: https://abc.com/test
You need to enter "http" if you don't have SSL on your site. (Example: http://abc.com)
9. Delete the install folder.
After installation, if you see "404 Not Found" error or if you can not login to your site, please check your main directory.
There should be a .htaccess file. If you don't have this file, none of your links will work. You can find this file in the main directory of script files.
Depending on the operating system you are using, such setting files may be hidden in your computer. In this case, you may not see this file. You can see this file by making the hidden files visible on your computer.
.env Configuration File
This file contains some general settings for your site.
CI_ENVIRONMENT: Default value of this variable is "production". This option will not display if there is an error on your site.
Instead, you will see the "An error occurred!" message.
To see the errors, you need to change the value of this variable to "development".
Example:
CI_ENVIRONMENT = development
app.baseURL: This is your site base URL. It is very important to add your correct site URL to this field.
If you add a wrong site URL, your site will not work.
Examples:
Installing to Main directory: app.baseURL = https://domain.com
Installing to subdomain: app.baseURL = https://demo.domain.com
Installing to folder: app.baseURL = https://domain.com/new
PURCHASE_CODE: You need to enter your purchase code to this field.
LICENSE_KEY: You need to enter your license key to this field.
cookie.prefix: This value is used for cookies to avoid collisions.
Default value is "vr", but you can change this value and add a unique value for your site. You must not add a special character to this field.
File Upload Settings
If you want to upload large files, you may need to make some settings on your server. Also, Varient performs image optimization while uploading images. This optimization uses memory.
If you try to upload large files without doing some settings on your server, you can get an error.
If you can't upload large files, you need to set these PHP values. These are recommended minimum values.
With these settings, you can only upload files up to 32 MB in size. If you want to upload larger files, you need to increase the "32M" value.
If you think your upload will take more than 30 seconds, you can increase the max_execution_time value also.
If you cannot upload large files after making these settings, you may need to increase client_max_body_size value in your server.
To set these values follow the steps:
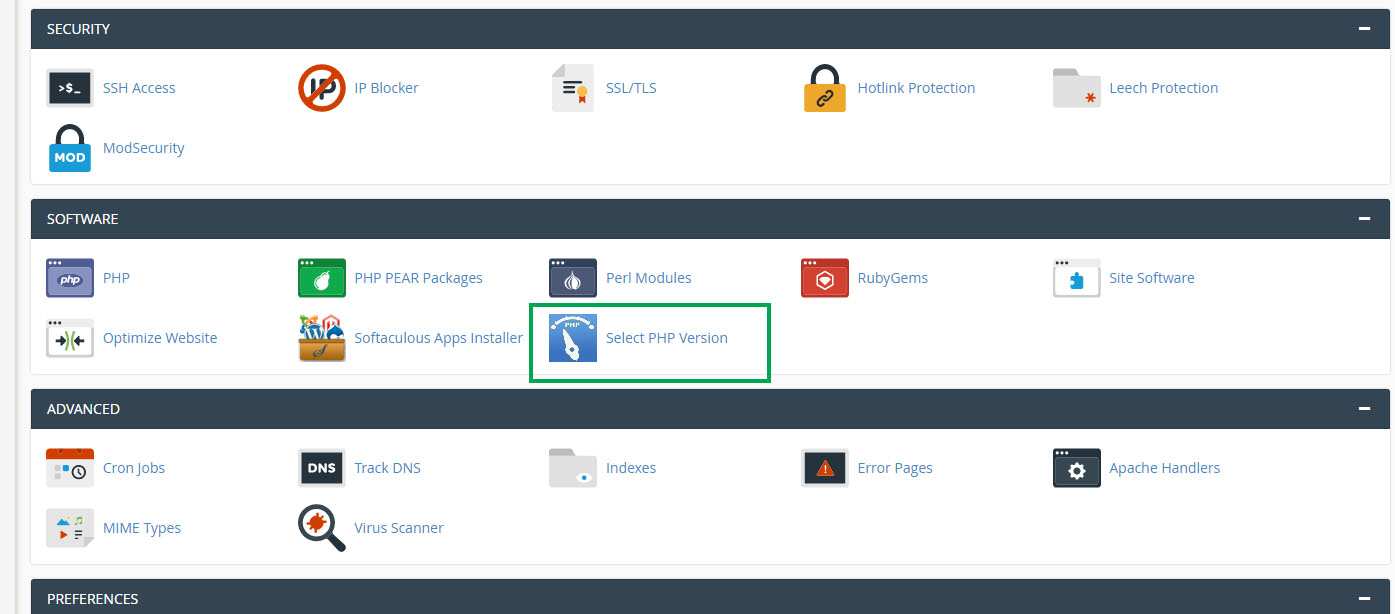
Go to your cPanel and click "Select PHP Version"
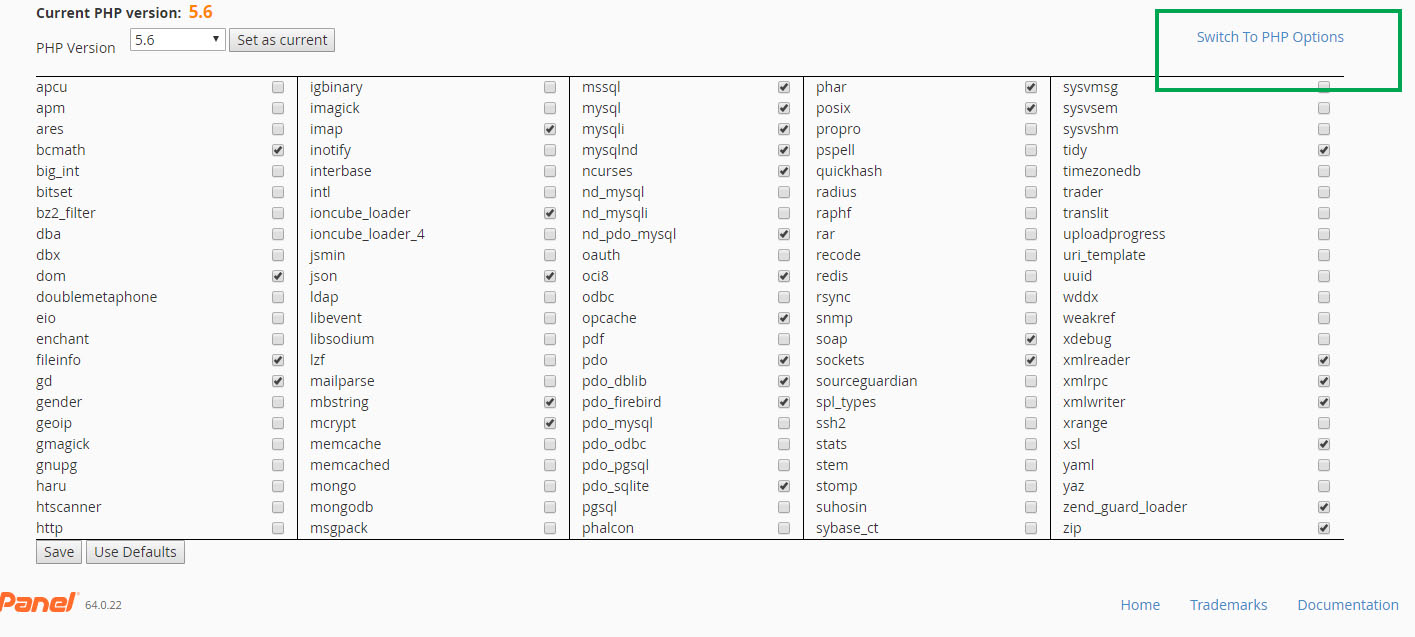
Then click "Switch to PHP Options"
Then set the values "upload_max_filesize", "post_max_size" and "memory_limit" as you see in the picture.
If you can not reach these settings, please contact your hosting provider and ask them to make these settings.
Quick Start
✓ Accessing Admin Panel: After installation, you will be redirected to home page. Login with your Admin email and password. After login, you will see your username in the navigation, click your username and click "Control Panel" link on the dropdown menu.
✓ Updating Profile Information: Click your username that in the top menu and then click "Settings" link. In this page you can edit your Email Address, Username, Slug and you can add some text about yourself.
✓ Changing Admin Password: Click your username that in the top menu and then click "Settings" link. Click "Change Password" tab. Fill out the form and change you password.
✓ Updating Contact Information: Click your username that in the top menu and then click "Settings" link. Click "Contact Informations" tab. Fill out the form and update your location information.
✓ Adding Social Links to Your Profile: Click your username that in the top menu and then click "Settings" link. Click "Social Media" tab. Fill out the form and update your social links.
✓ Adding Category: Go to "Categories" section from navigation and click Categories. Then fill out the Add Category form and click Add Category button. To add subcategory, Go to "Categories" section and click Subcategories. Then fill out the Add Subcategory form and click Add Subcategory button.
✓ Adding Post: To add a post you should first add a category. After adding a category, go to "Add Post" section. Select you post format and add your post.
✓ Adding Page: Go to "Pages" section from navigation and click Add Page. Then fill out the form and click Add Page button. If you want to manage existing pages: Go to "Pages" section from navigation and click Pages. Then you will see all pages in your site. You can make any change by selecting edit option for each page.
✓ Adding Widget: Go to "Widgets" section from navigation and click Add Widget. Then fill out the form and click Add Widget button. If you want to manage existing widgets: Go to "Widgets" section from navigation and click Widgets. Then you will see all widgets in your site. You can make any change by selecting edit option for each widget.
✓ Adding Poll: Go to "Polls" section from navigation and click Add Poll. Then fill out the form and click Add Poll button.
✓ Adding Images to Gallery: To add images to gallery, first you should add some albums for images. Go to "Gallery" section from navigation and click "Albums". Then fill out the Add Category form and click Add Category button. After adding some albums, go to "Gallery" section and click Images. Then fill out the Add Image form and click Add Image button.
✓ Sending Email to Subscribers (Newsletter): To use newsletter feature, you should first make your email settings. Go to "Settings" section from navigation and click Email Settings link. Enter your mail server informations and click Save Changes button. Then go to "Newsletter" section from navigation and fill out the Send Email to Registered Emails form and click the Send Mail button.
✓ Running Ads: If you want to add your ad codes to your website, this is very easy in the Varient. Go to "Ad Spaces" section and add your ad codes then click Save Changes button.
✓ Managing Users: Go to "Users" section from navigation. You will see all users registered. You can select Change User Role, Delete User and Ban User options for each user.
✓ Adding Author: Varient is a multi-author system, so authors can add posts. To add an author to the system first user should register from register page. Then Admin should go to "Users" section from navigation and should set user role as Author. After this process user will became an Author and he can reach his own Panel to manage his posts.
Admin Panel
There are some counters in the Admin panel's home page. These counters:
Posts: Shows Posts count
Pending Posts: Shows Pending Posts count (Hidden post count)
Drafts: Shows Drafts count
Scheduled Posts: Shows Scheduled Posts count
In addition to these, there are also sections which the last five comments, last contact messages and last
registered users are shown in the index page.
Navigation
You can manage your navigation from this section. You can easily sort your menu links with the drag and drop option. Also, you can change parent link of each item with drag and drop option.
Add Menu Link: You can add a new link to the navigation from this form. Also you can add a dropdown link to the navigation by selecting "Parent Link". Menu Limit: You can set the number of items that will be displayed on the main navigation with this option. For example, if you set this to 9, you will see 9 links on your main navigation.
If you have more than 9 links, these links will be displayed under a "More" menu.
Themes
You can select a layout option from this section.
Pages
You can add, update or delete your pages from this section.
Add Page: Go to "Pages" section from navigation and click Add Page. Then fill out the form.
Title: Your page title.
Slug: Slug for SEO friendly url. If your page title consists of special characters your title slug will not be generated. In this case you should add custom slug.
Description: You can add Description (Meta Tag) for page.
Keywords: You can add Keywords (Meta Tag) for page.
Parent Link: You can select parent link.
Menu Order: Your pages will order according to this value.
Location: You can select your page link location.
Visibility: You can hide or show your page.
Show Only to Registered Users: If you want to show page only to registered users you should select yes.
Show Title: You can hide or show your page title.
Show Breadcrumb: You can hide or show your page breadcrumb.
Show Right Column: You can hide or show sidebar on your page.
Content: Your page content. You can add image and video with text editor.
Update Page: Go to "Pages" section from navigation and click Pages. You will see page list and you can make changes
on pages by selecting "Edit" option for each pages.
Delete Page: On the same list you can delete pages by selecting "Delete" option for each pages.
Add Post
You can add posts from this section. After clicking "Add Post" link from the navigation, you will see post format options. You need to select one of these options to add your post.
Title: Post title.
Slug: Slug for SEO friendly URL. If you leave this field empty, the system automatically generate your title slug.
Summary: You can add short description about post.
Keywords: You can add Keywords (Meta Tag) for post.
Visibility: You can hide or show your post.
Category: You should select a category for post.
Subcategory: You can select a subcategory for post.
Show Right Column: You can hide or show right column. If you hide it, your post will be displayed full page.
Add to Featured: You can add your post to the featured posts.
Add to Breaking: You can add your post to the breaking news (newsticker).
Add to Slider: You can add your post to the index slider.
Add to Recommended: You can add your post to the recommended posts.
Show Only to Registered Users: If you want to show post only to the registered users you can select this option.
Scheduled Post: You can select a future date for your posts. Your posts will be automatically published when the date you select is reached.
Tags: Tags for post.
Optional Url: If you enter a url here there will be a button in your post page to access this url.
Show Only to Registered Users: If you want to show post only to the registered users you can select this option.
Main Image: Image for post.
Content: Post content. You can add image and video with text editor.
Additional Images: If you want to add more than one main image to your post, you can select more images from this section. If you select an image from here, the slider will be active (There will be a slider in post details page).
Files: If you want to add downloadable files to your posts (PDF, ZIP, DOC .. etc), you can add them from this section.
Adding Video Post
You can upload or embed your video to add a video post. If you want to upload your video, you can upload it via file manager and then select it for your post. If you want to embed a video from Youtube, Vimeo, Dailymotion or Facebook,
you can enter your video URL to "Video URL" field. After adding your link to this field, you need to click "Get Video" button. When you click this button, your video will be added to your post. If you want to add a video from sites
other than these sites, you can add your video embed code to the "Video Embed Code" field.
Some servers may show an error when you want to add images or videos to the post content, or may not add your post to the database. If your server has some security settings, you may see such problems.
In this case, you need to contact your server provider and change these security settings.
Bulk Post Upload
You can upload your posts with a CSV file from this section. There is a CSV file template on the "Bulk Post Upload" section. You can download this file and add your posts to this file.
You need to add your posts to this file according to these rules:
Field
Description
lang_id
Data Type: Integer Required Id of the language of the post Example: 1
title
Data Type: String Title of the post Required Example: Test post title
title_slug
Data Type: String Slug of the post. You need enter a valid slug if you want to fill this field. If you do not add the slug, the system will generate the slug automatically. Optional Example: test-post-title
keywords
Data Type: String Keywords of the post Optional Example: test, post, title
summary
Data Type: String Summary of the post Optional Example: This post summary
content
Data Type: String Content of the post Optional Example: This post content
category_id
Data Type: Integer Category id of the post Required Example: 2
post_type
Data Type: String Type of the post (article or video) Required Example: article
video_embed_code
Data Type: String Video embed code of the post Optional Example: https://www.youtube.com/embed/V9ypxcc0TpI
status
Data Type: Boolean Status of the post (1 or 0). If you want to add posts as draft, you need to write 0. Required Example: 1
image_url
Data Type: String Image URL of the post. If you add an image URL, the script will download the image and save it in your server by resizing. Optional Example: https://upload.wikimedia.org/wikipedia/commons/7/70/Labrador-sea-paamiut.jpg
image_description
Data Type: String Description of the post image Optional Example: Labrador sea
tags
Data Type: String Tags of the post Optional Example: test, post, title
Do not use double quotes (") in your texts. It can broke the CSV structure.
Posts
You can add, update or delete posts from this section.
Post Options
You can access post options by clickling "Select an option" button in the posts page.
Edit: You can edit posts with this option.
Add to Slider: This option will add the post to the slider.
Add to Featured: This option will add the post to the featured section (the four boxes at the right side of the slider).
Add to Breaking: This option will add the post to the breaking news (newsticker).
Add to Recommended: This option will add the post to the recommended posts (the posts in the sidebar of the site).
Delete: You can delete posts with this option.
Pending Posts
You can see the posts that have not been approved yet from this section. Admin can select "Approve" option for these posts to approve them. Also, if you select "Hide" for "Visibility" option for posts, these posts will be added to Pending Posts.
Scheduled Posts
You can see your scheduled posts from this section. Your post will be automatically published when the date you select is reached. If you want to publish immediately, you can click "Publish" option.
You need to create a cron job function to automatically publish your posts. Read this section to see how you can add a cron job function in your server: Cron Job
This is the URL that you need to run with your cron job function: http://domain.com/cron/check-scheduled-posts **Do not forget to change "domain.com" with your domain name.
Drafts
You can see drafts (the posts not yet added) from this section.
RSS Feeds
You can add, update or delete RSS Feeds from this section.
Import RSS Feed
Go to "RSS Feeds" section from navigation and click Import RSS Feed. Then fill out the form.
Feed Name: Feed name.
Feed URL: You should enter a valid RSS Feed URL to this field.
Number of Posts to Import: You can define posts count that you want to add your site.
Category: Posts will be added to category that you selected.
Subcategory: Posts will be added to subcategory that you selected.
Images: If you want to download the images to your server, you need to select "Download Images to My Server" option. If you don't want to download the images, you need to select "Show Images from Original Source" option
Auto Update: You can select this option if you want to update with Cron Job.
Generate Keywords from Title: If you select "Yes" for this option, the system will create keywords from the title during adding posts.
Show Read More Button: You can hide or show Read More button with this option.
Add Posts as Draft: You can add your posts as draft by selecting this option.
Read More Button Text: You can add a text for the Read More button.
Update Feed
Go to "RSS Feeds" section from navigation and click RSS Feeds. You will see RSS feeds list and you can make changes on RSS feed by selecting "Edit" option for each RSS feeds.
Delete Feed
On the same list you can delete RSS feeds by selecting "Delete" option for each RSS feeds.
Cron Job
You need to create a cron job function to automatically add posts from your RSS feed. Read this section to see how you can add a cron job function in your server: Cron Job
This is the URL that you need to run with your cron job function: http://domain.com/cron/update-feeds **Do not forget to change "domain.com" with your domain name.
When you update RSS feeds with Cron, only 3 feeds are checked in turn each time. This system will solve the timeout and resource usage problems that may occur on the server.
Categories
You can add, update or delete categories from this section.
Add Category
Go to "Categories" section from navigation and click Categories. Then fill out the Add Category form.
Category Name: Category name.
Category Slug : Slug for SEO friendly url. If your category name consists of special characters your
slug will not be generated. In this case you should add custom slug.
Category Description: You can add Description (Meta Tag) for category.
Category Keywords: You can add Keywords (Meta Tag) for category.
Category Color: You should select a color for category. This color will be used for your category
block color and category label color.
Menu Order: Your categories will be listed according to this order.
Show on Menu: You can show or hide your categories on the menu.
Show at Homepage: You can show or hide your categories at Homepage.
Category Block Style: You should select a block style for category.
Parent Category: You should select a top (parent) category.
Update Category
Go to "Categories" section from navigation and click Categories. On the category list you can make changes on categories by selecting "Edit" option for each categories.
Delete Category
On the same list you can delete categories by selecting "Delete" option for each categories.
Widgets
You can add, delete or update sidebar widgets from this section.
Add Widget
Go to "Widgets" section from navigation and click Add Widget. Then fill out the form.
Widget Title: Widget title.
Widget Order: Widgets will be listed according to this order.
Widget Visibility: You can hide or show a widget.
Content: Widget content.
Where To Display: Widgets are connected to the categories (except the classic theme). When you add a category, it will be displayed in full width on the homepage (without a sidebar).
If you select a category with this option, the widget will appear as the sidebar of the category you selected.
Update Widget
Go to "Widgets" section from navigation and click Widgets. On the widget list you can make changes on widgets by selecting "Edit" option for each widgets.
Delete Widget
On the same list you can delete widgets by selecting "Delete" option for each widgets.
Polls
Varient has poll feature. You can add unlimited polls and you can manage these polls from this section.
Add Poll: Go to "Polls" section from navigation and click Add Poll. Then fill out the form.
Question: Poll question.
Options: Options for your question.
Status: You can enabled or disabled a poll.
Update Poll: Go to "Polls" section from navigation and click Polls. On the poll list you can make changes
on polls by selecting "Edit" option for each polls.
Delete Poll: On the same list you can delete poll by selecting "Delete" option for each polls.
Gallery
You can manage the gallery from this section.
Before adding new images you have to add albums for gallery.
To add a new image, select your image from "Add New Image" form and then click "Add Image" button.
If you want to delete an image from gallery, click the Select an option button and click delete.
Contact Messages
You can see the messages that users sent from the contact form on the site from this section.
If you want to delete a message from list, click the Select an option button and click delete.
Comments
Varient has comment approval system. Only approved comments will be published in the site. If you want to disable this system and publish directly all the comments, you can disable this system from "Preferences" section in the Admin panel.
Pending Comments
You can see and approve the pending comments from this section.
Approved Comments
You can see and delete the approved comments from this section.
Newsletter
The Newsletter allows you to share some updates and interesting things with the users.
Users: All registered users are listed on this list. You can select the registered users that you want to send email and click the "Send Email" button. Subscribers: All subscribers are listed on this list. You can select the subscribers that you want to send email and click the "Send Email" button.
Settings:
Status: You can enable or disable the newsletter system with this option.
Newsletter Popup: Varient has a newsletter popup. New visitors will see this popup when they open the site. You can enable or disable this popup with this option.
To use the Newsletter section, you need to make your email settings. For this, you can read the "Email Settings" section.
Reward System
Reward system allows authors to earn money by the number of page views of their posts. If you enable this system, you agree to pay authors based on page views.
How it works?
Admin need to add a reward amount for per 1000 page views. After adding this amount and selecting "Enable" for status, the system will start to count of every unique page views for authors and the earnings will be calculted automatically by the system.
The earnings collected in the authors' accounts will be sent to the authors manually by the site management. Site management can make these payments through "IBAN", "SWIFT" or "PayPal".
After the payment is made manually, a "Payout" record need to be created for this payment in the "Reward System / Payouts" section. The generated payout amount will be automatically deducted from the author's balance and the payment will be completed.
Authors can see these payments in the "Payouts" section of their profile.
To enable the reward system for an author, you need to go to "Users" section and select "Enable Reward System" for the author.
How does the script count unique page views?
Our script uses Cookies, IP Address and User-Agent information to count unique page views. While counting these page views, it also checks whether the request is sent by a robot, browser or a mobile device. It does not count the requests that coming from the robots.
Settings
Status: You can enable or disable this system with this option.
Reward Amount for 1000 Pageviews: The reward amount. Earnings per page view will be calculated by dividing by 1000.
Currency
You need to enter your curreny details from this section.
Payout Methods
These are the payment methods that you can send money to authors. You can disable unwanted methods from this section.
Earnings
You can see the balance of the authors from this section. Authors can select different payout methods to receive their earnings. You can see the default payout account details of the authors by clicking the "Payout Method" button.
Payouts
You can see the payments made to the authors in this section.
Add Payout
After paying authors manually, you need to add a payout from this section. The payout amount will be deducted from the author's current balance.
Pageviews
You can see the page views in the last 30 days from this section.
Ad Spaces
Varient has a mobile-friendly advertising system.
There are 2 different ad code fields for each ad space (Desktop Banner and Mobile Banner) and thanks to these options, your site will not have any design problems on mobile devices.
The Desktop Banner will be displayed on screens larger than 992px and the Mobile Banner will be displayed on screens smaller than 992px. So when adding an ad you have to fill both fields.
Ad Size: You can add an ad of any size by paying attention to the placement of the ad spaces. You need to enter the dimensions of the ad with this option. Ad Code: You will paste your ad code into this field.
AdSense Activation Code
You can add your Google Adsense code from this section. This code will be added to footer of the site and it will be enabled for all pages. After adding this code, you can add your ad codes to ad spaces.
Our script does not make any changes in the ad codes you add. If you don't see ads on your site after adding your ad code, please check your ad code.
If you have added Adsense code and your ads are not displayed, you can wait for your ads to appear or you need to contact the Adsense support team. If your ads are not running, there may be a problem with your Adsense account. Our script does not affect your ad codes.
Users
You can manage registered users from this section. Go to "Users" section from navigation.
Options
Change User Role: If you want to change user role you can use "Change User Role" option.
Confirm User Email: You can verify a user email with this option.
Enable Reward System: You can enable author reward system with this option.
Ban User: If you want to ban a user you can use "Ban User" option.
Edit: You can edit a user by selecting edit option.
Delete: You can delete a user by selecting delete option.
There are 4 roles in the system and you can manage permissions for these roles from "Roles & Permissions" section.
Add User
You can add a new user from this section.
Administrators
You can see administrators from this section.
Password Reset
To use the Password Reset section, you need to make your Email Settings. The system will send a password reset link, so it is necessary to enter
a working email server credentials to use email system. You can read more about email settings from here.
If you have not set up your email settings yet and have forgotten your password, you can reset your password from your database.
To do this, open your database via phpMyAdmin. Click on the users table and find your account in this table. Paste the following code to your password column. Make sure there is no space at the beginning or the ending of the code.
$2a$08$drmgGpMVGzdyiv7q5LUt3eUne8xh05XKrJPgMKaR3RgRwCQKXZpdu
After adding this code to your password column, you can login with "1234" password.
Roles & Permissions
Varient is a multi-author system, so there are different roles in the system. These roles are: Admin, Moderator, Author and User.
You can set permissions for these roles from this section.
SEO Tools
You can manege your site title, site keywords, site description etc. from this section.
Site Title: You site title.
Home Title: Your homepage title.
Site Description: Your site description.
Keywords: Your site keywords.
Google Analytics: You can add your Google Analytics code from here.
Sitemap
You can generate a sitemap.xml file from this section.
Generate Sitemap: This option will create a sitemap.xml file on your main directory. You can access this file with "http://domain.com/sitemap.xml" URL.
If your site has more than 50,000 links, the sitemap.xml file will be created in parts. Each of these sitemaps will have 49,000 links.
If you want to update your sitemap.xml automatically with a time interval, you need to create a cron job function on your server. Read this section to see how you can add a cron job function in your server: Cron Job
This is the URL that you need to run with your cron job function: http://domain.com/cron/update-sitemap **Do not forget to change "domain.com" with your domain name.
If you have too many links and you are seeing an error while generating the sitemap, you can try increasing the "max_execution_time" value in your server settings.
Social Login Settings
You can make your social login settings from this section.
If you want to use social login, you need to enable SSL on your site. In other words, all your URLs should be HTTPS.
If SSL is enabled on your site and your server automatically redirects all of your URLs to HTTPS, you can set up your social login settings.
If your site does not redirect automatically, read the "SSL and .htaccess" section.
Go to "Set up Facebook Login" option and click "Next".
Fill the form and click "Create App" button.
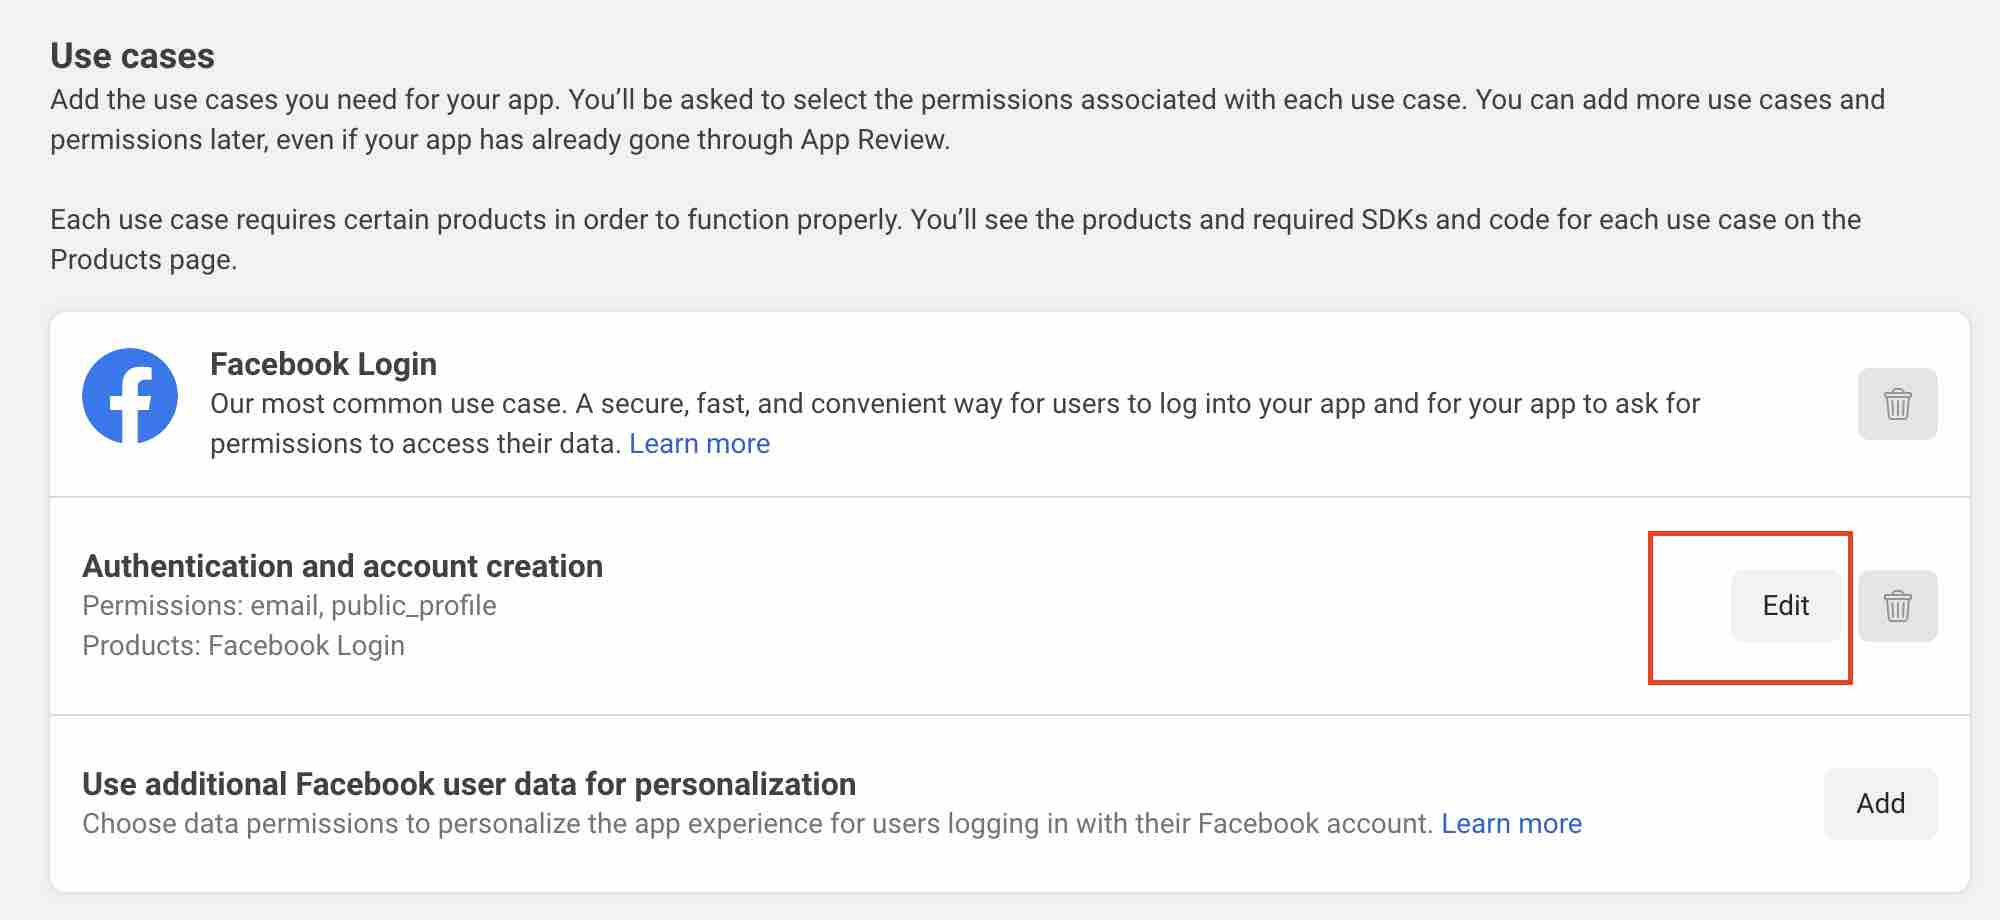
Click the "Use Cases" link from sidebar and click on the "Edit" button for the "Authentication and account creation
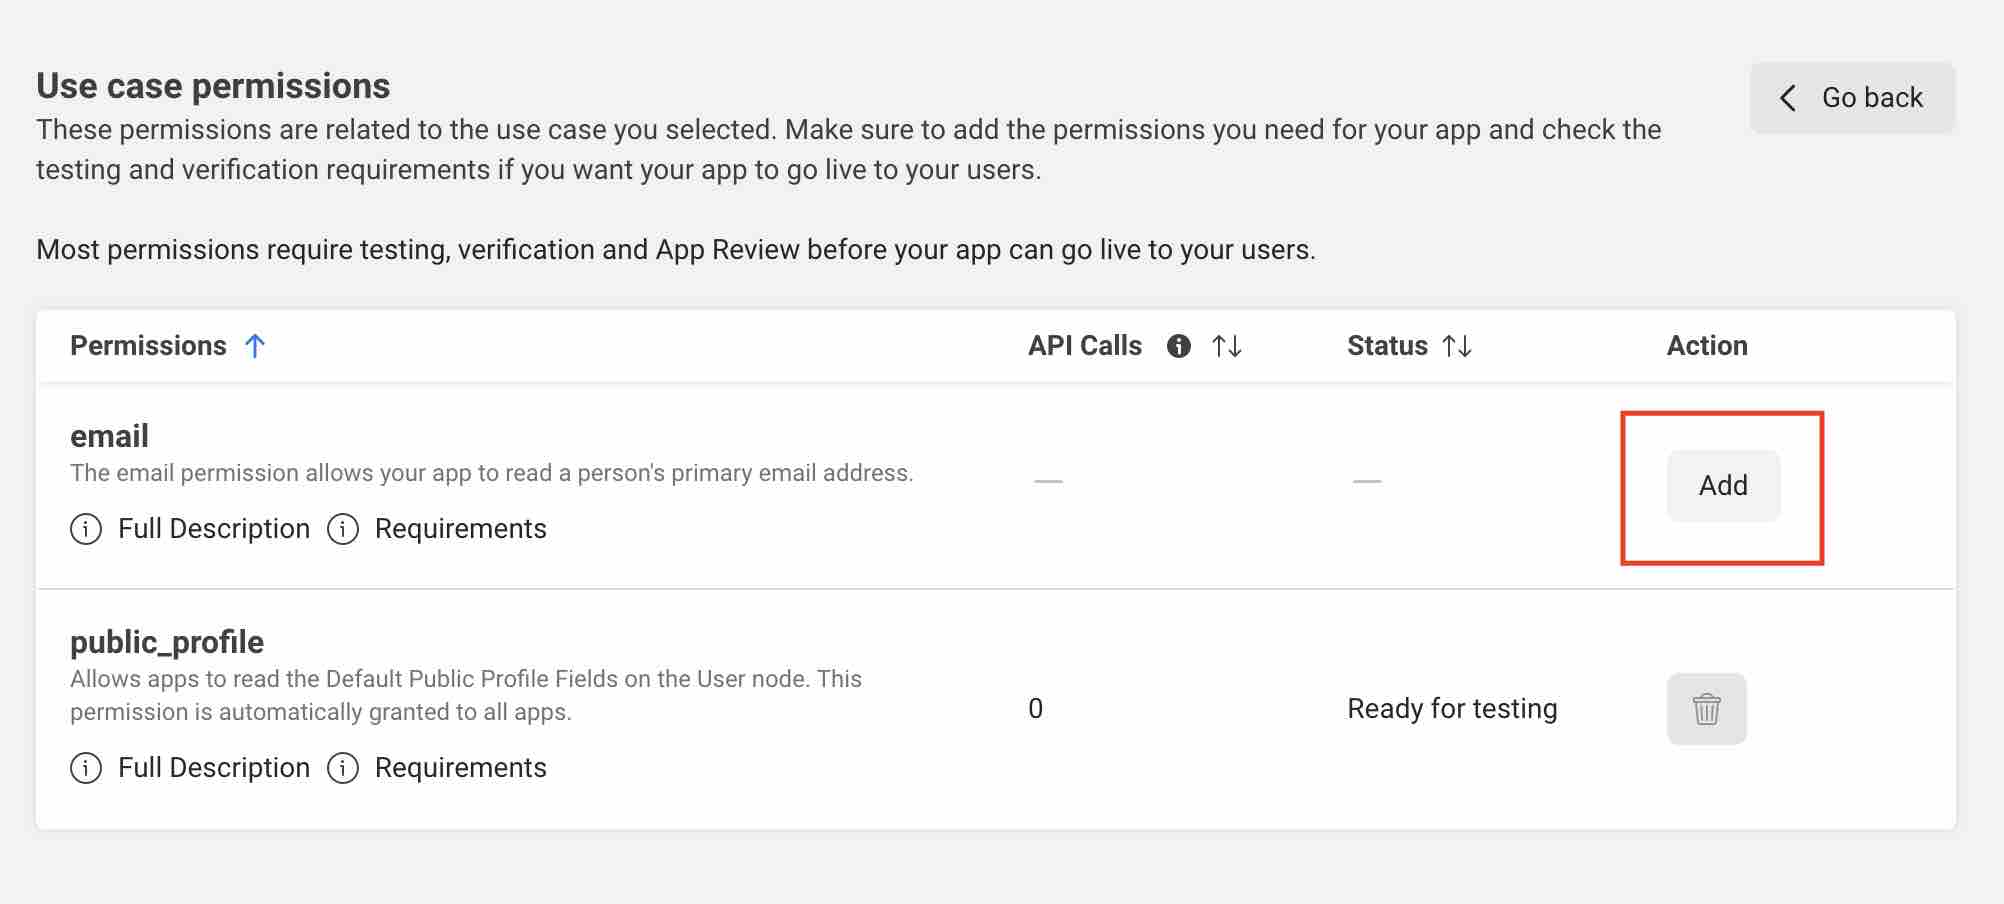
" option. Then click "Add" option for email permission.
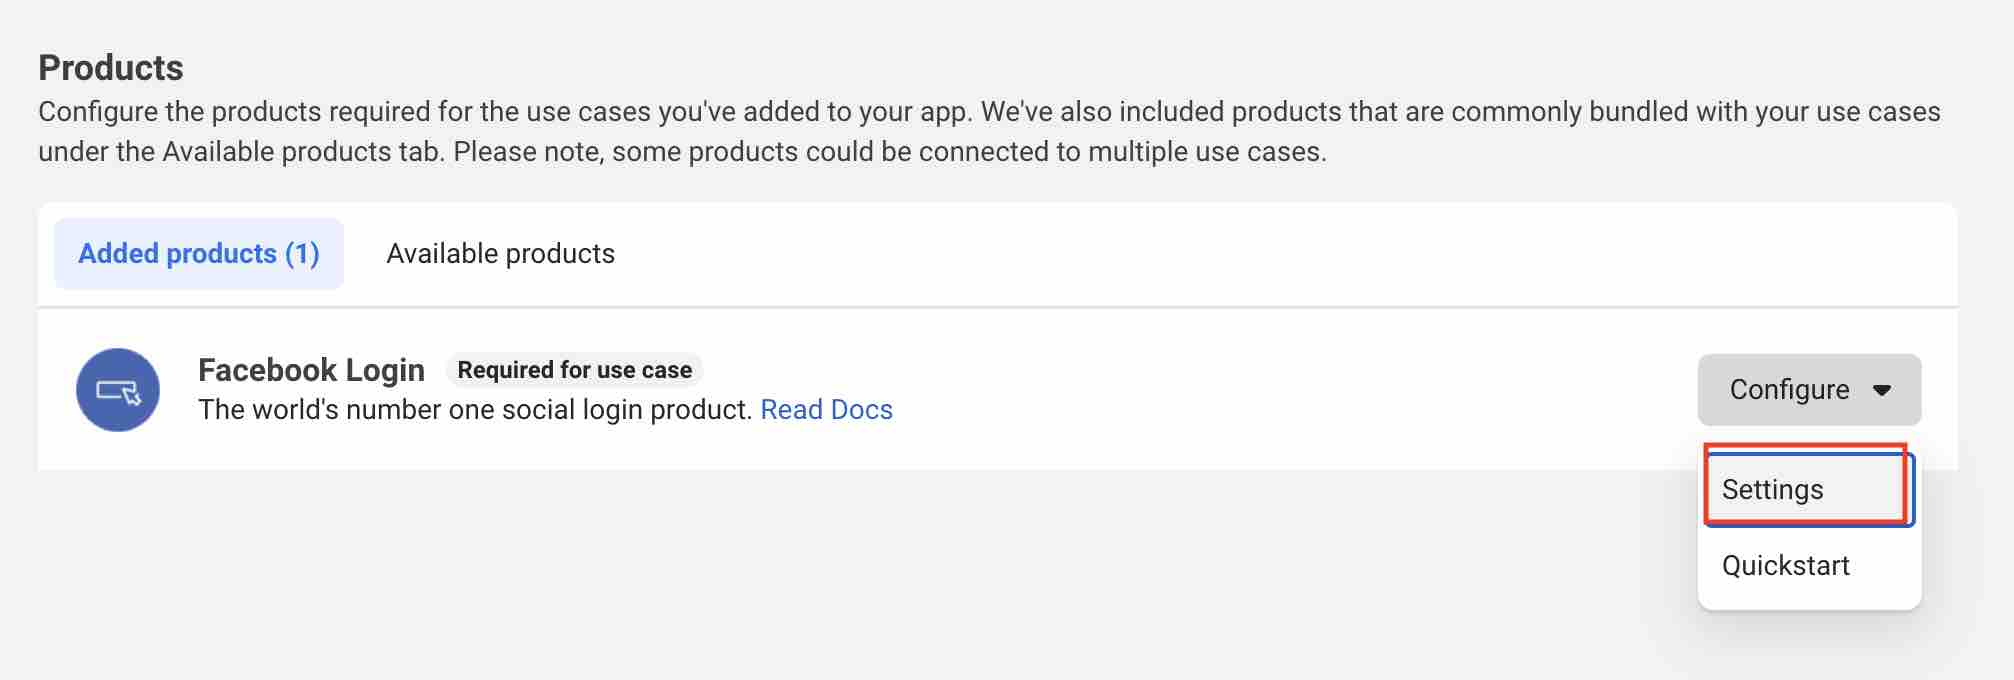
Click the "Products" link from sidebar. Then click the "Configure > Settings" option.
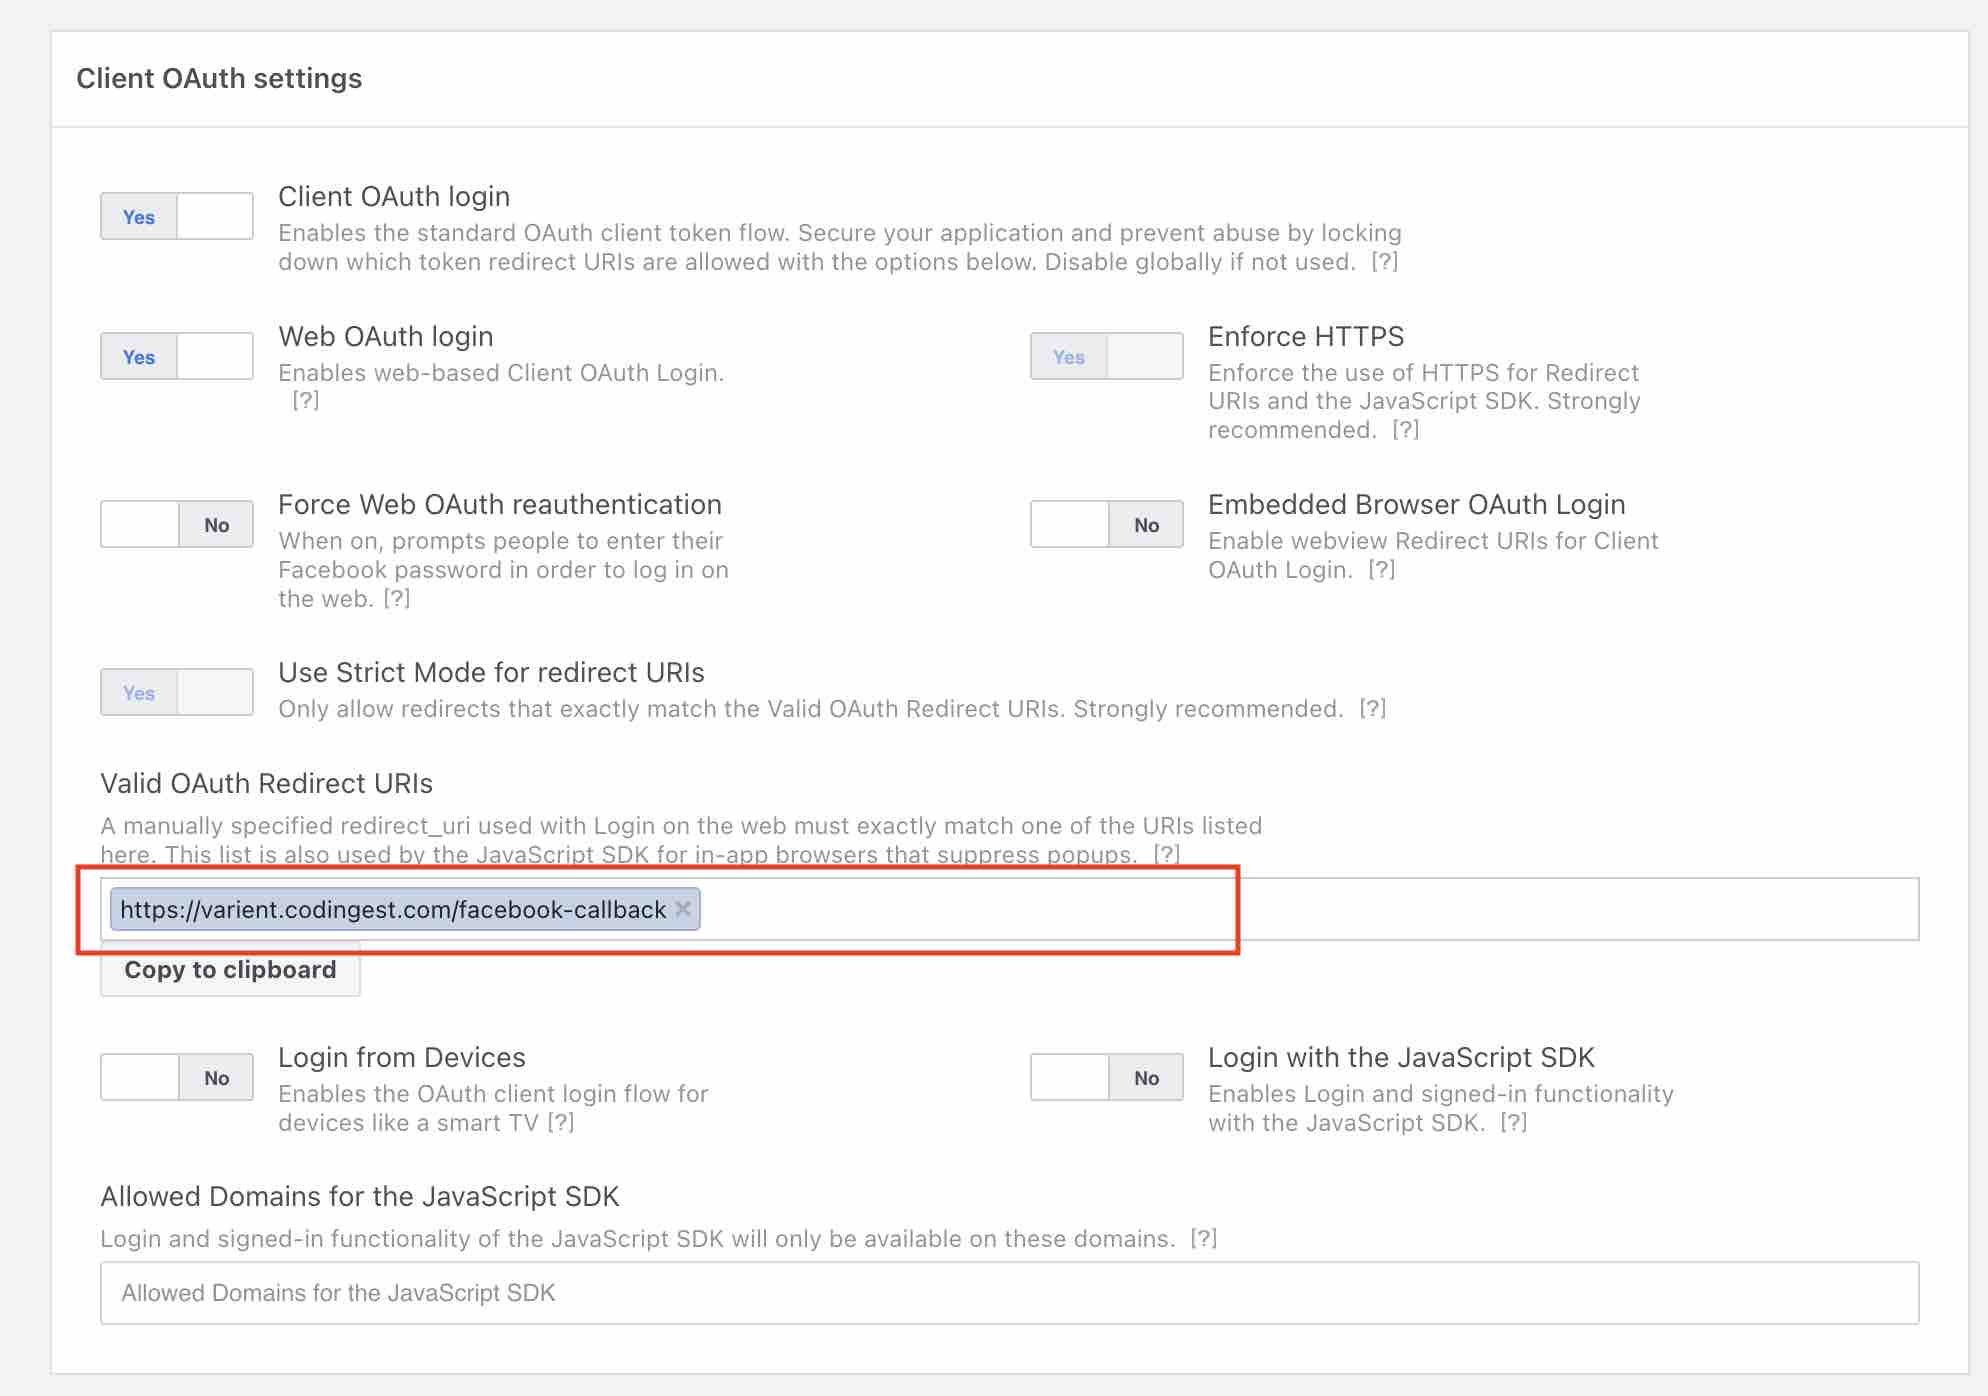
Enter Valid OAuth Redirect URIs: "https://your domain.com/facebook-callback" and click "Save Changes" button.
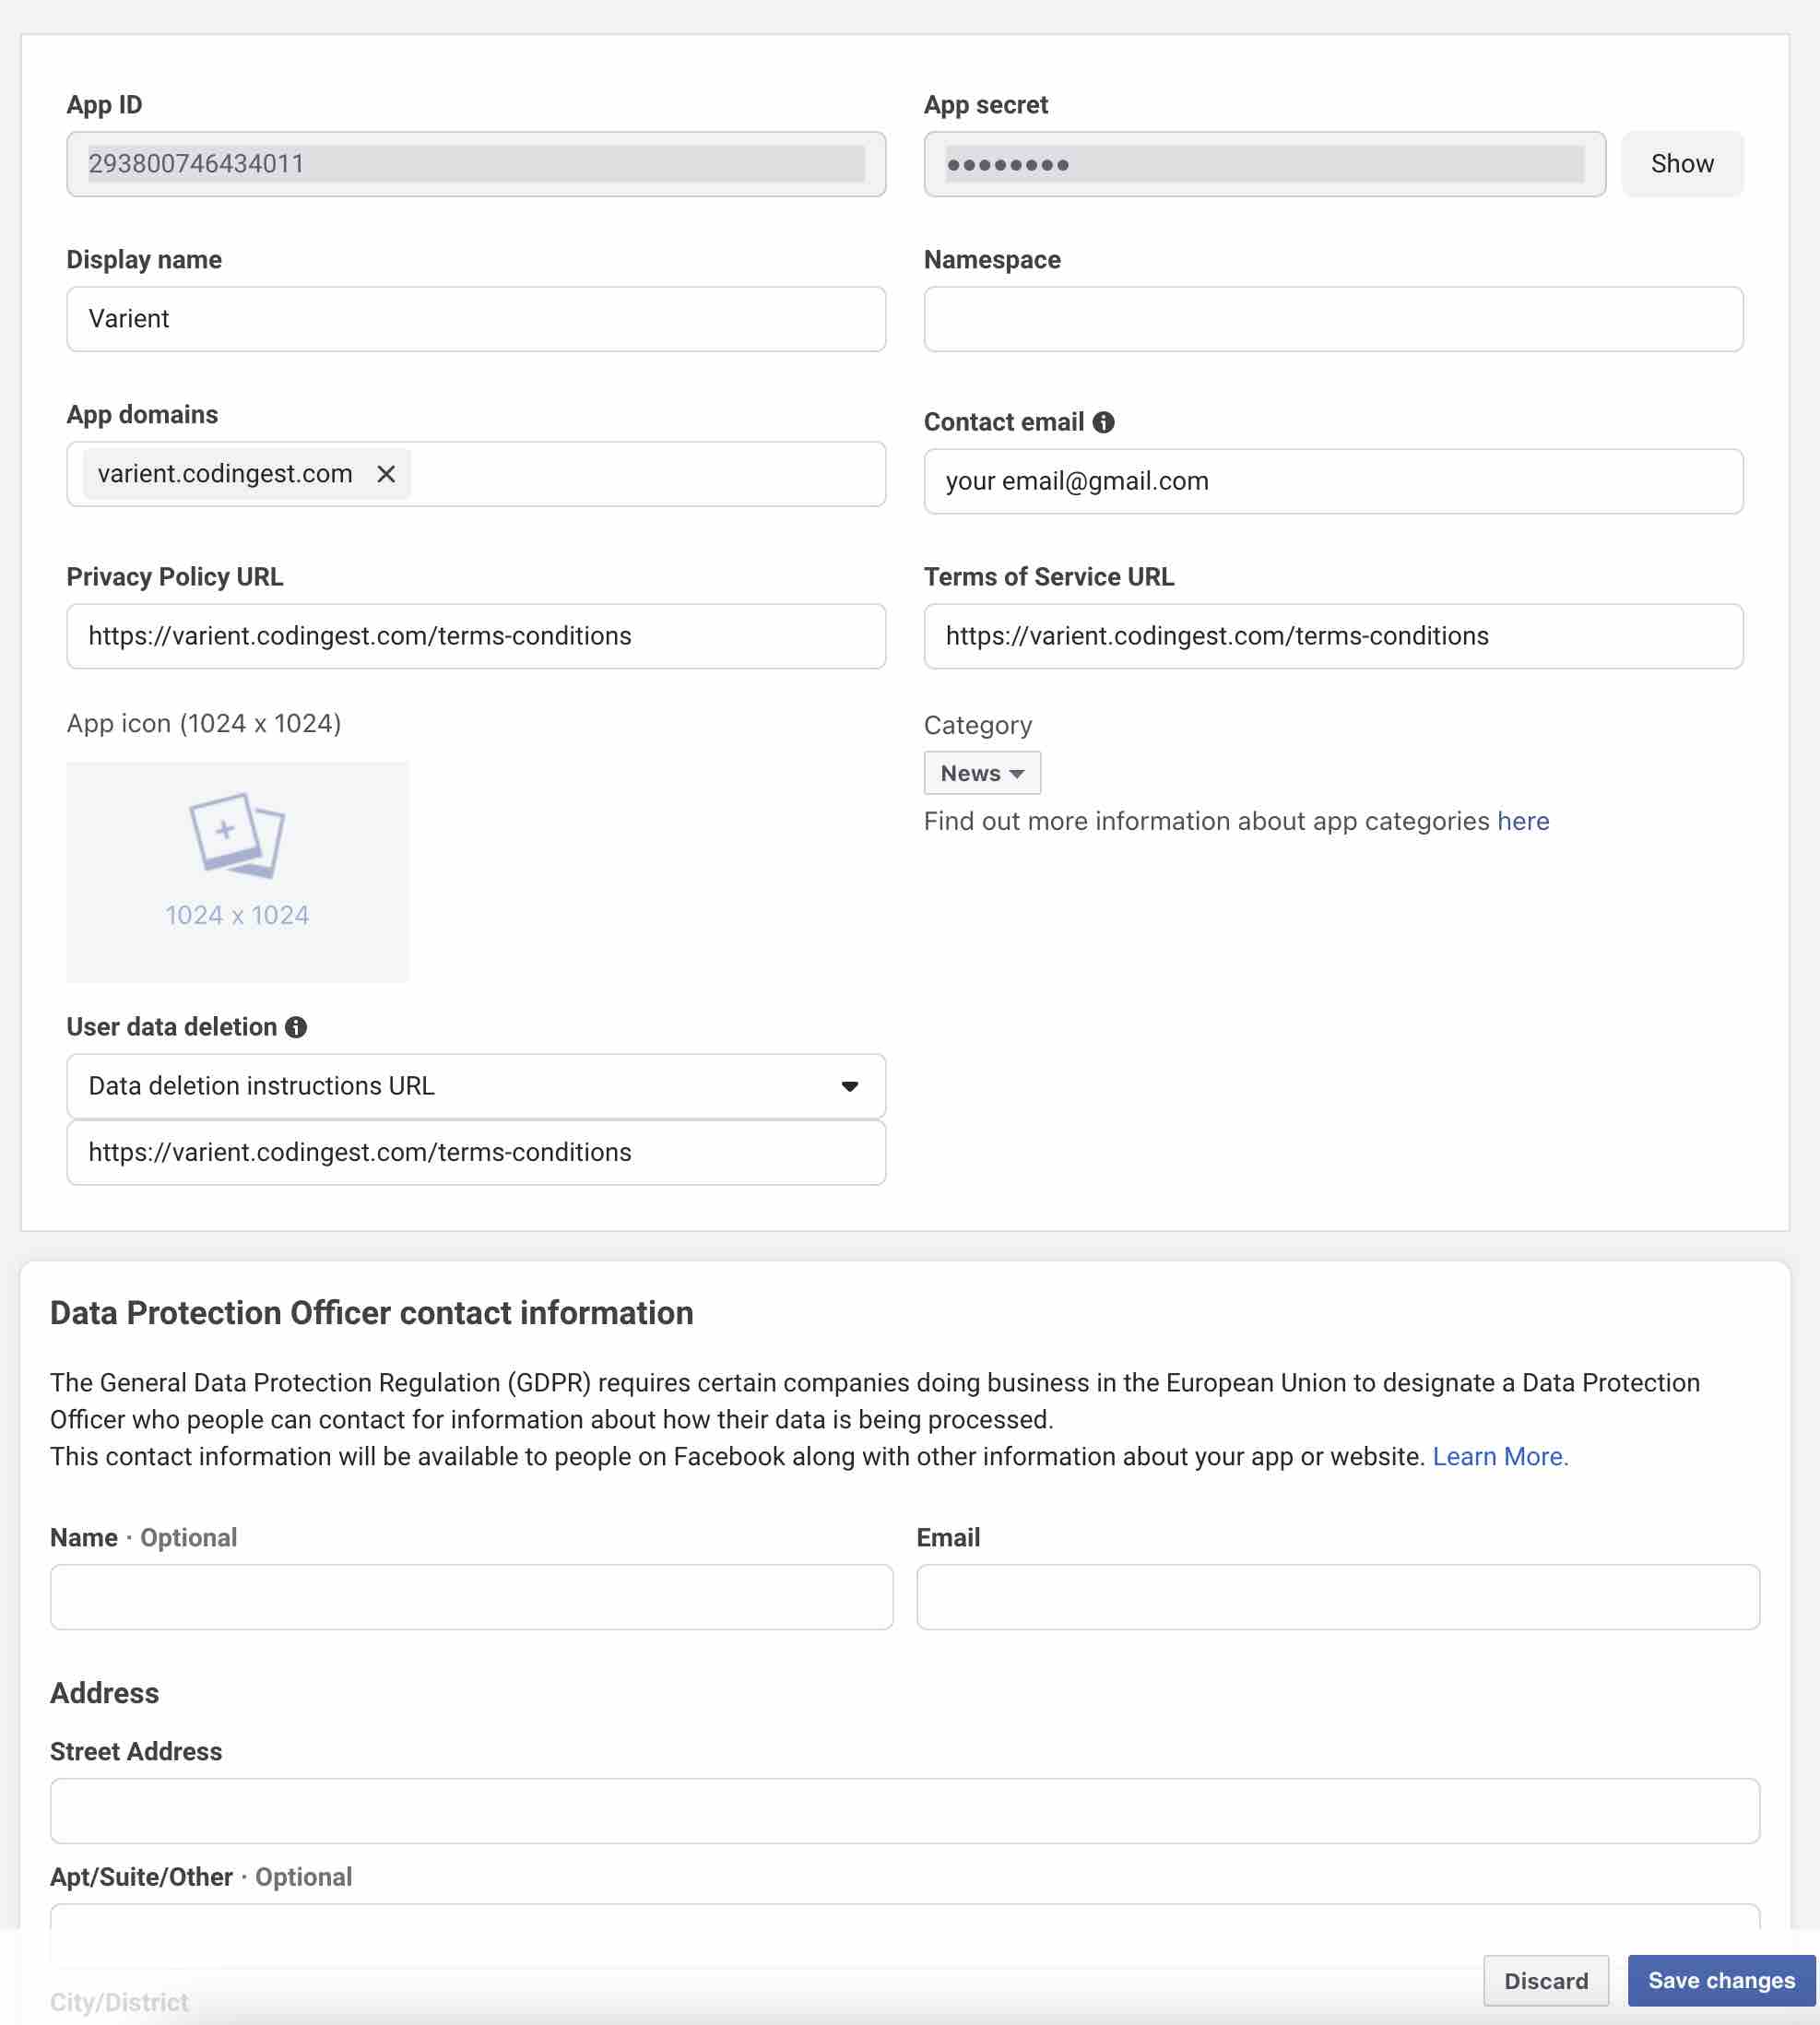
Click the "Settings > Basic" link from sidebar. Enter your domain to "App Domains"field.
Enter your Terms & Conditions page link to the "User Data Deletion" and "Privacy Policy URL" fields.
Select a category for your application and click "Save Changes" button.
**Copy "App ID" and "App Secret" values from this page and enter these
values from "Social Login" section in the Admin panel.
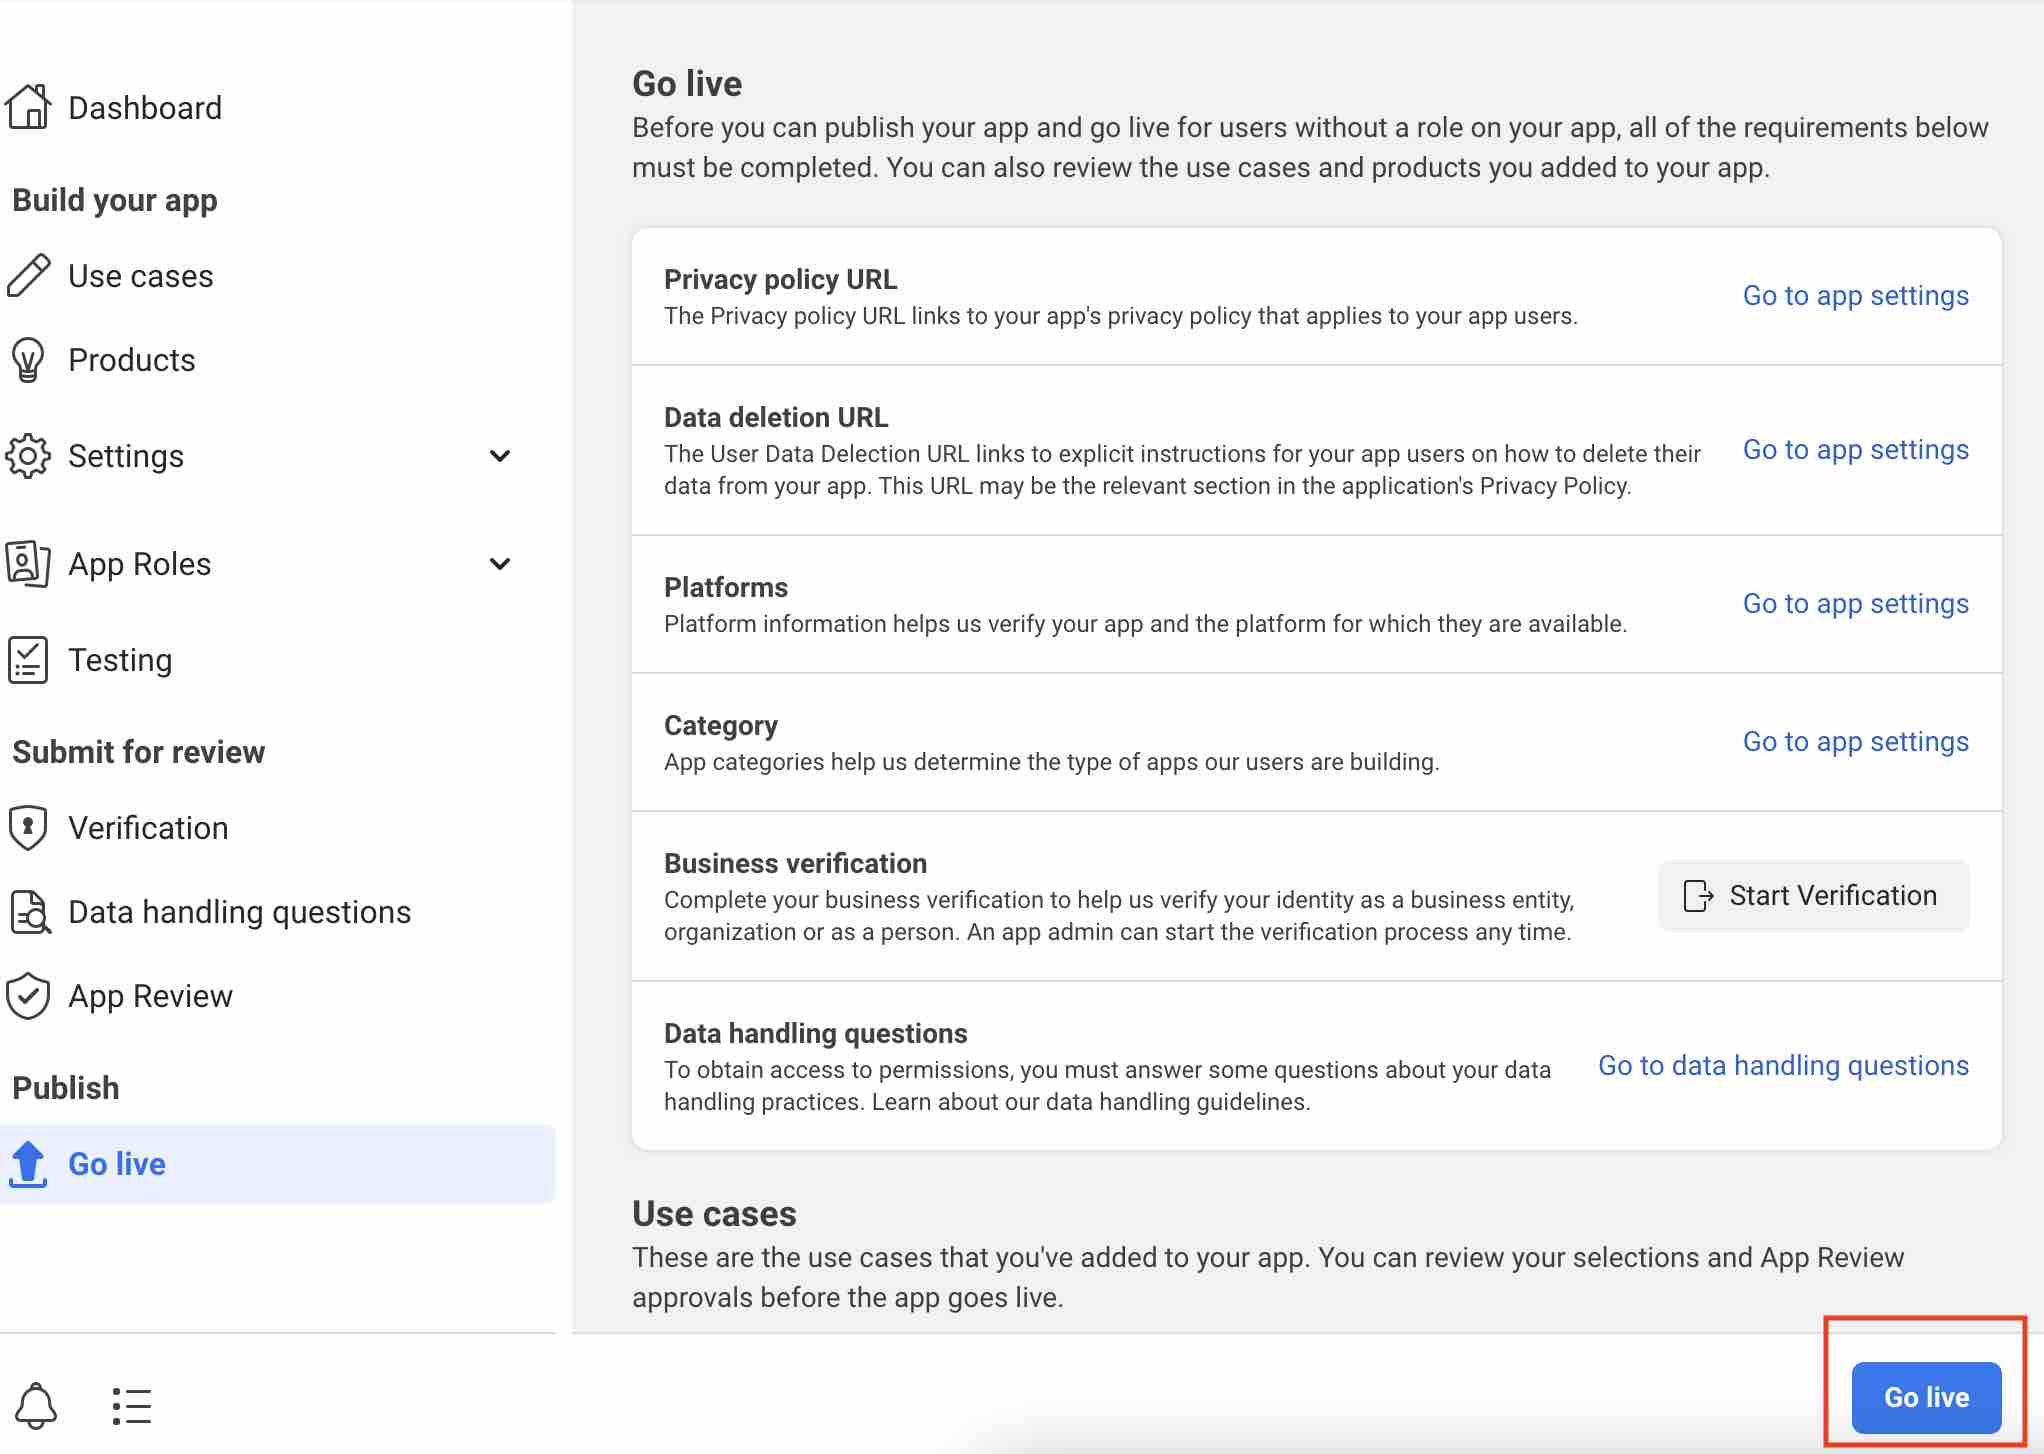
Click the "Go Live" link from sidebar. Then click the "Go Live" button.
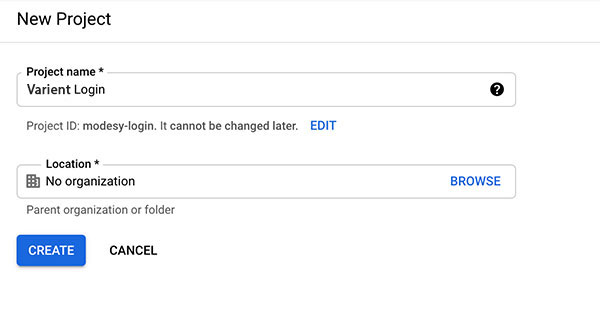
Enter your project name and click "Create" button.
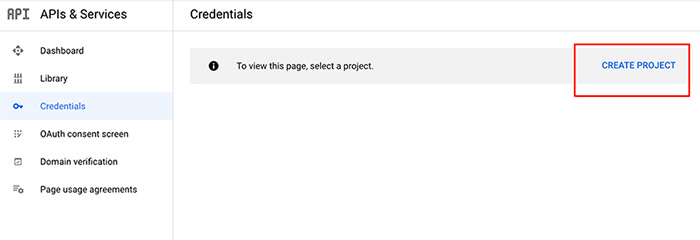
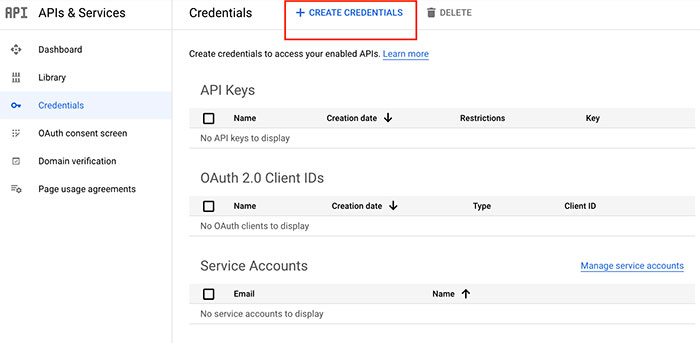
Click the "+ Create credentials" option.
Select the "OAuth client ID" option.
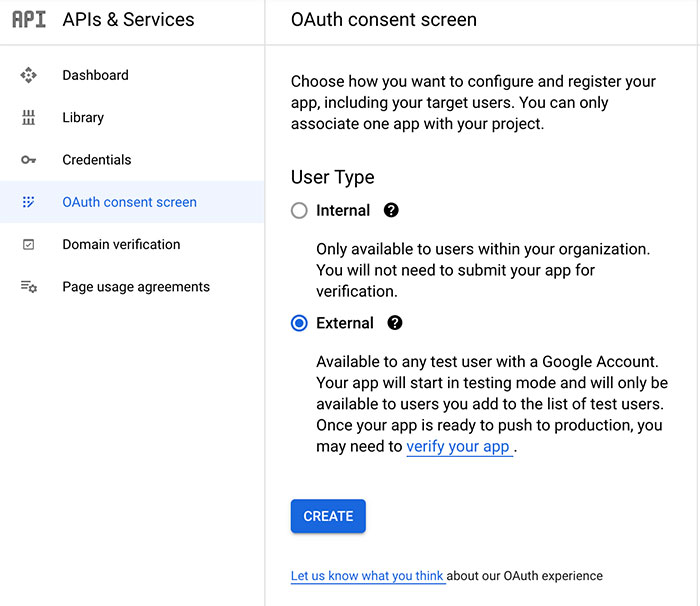
Click the "Configure Consent Screen" button.
Select the "External" option and click the "Create" button.
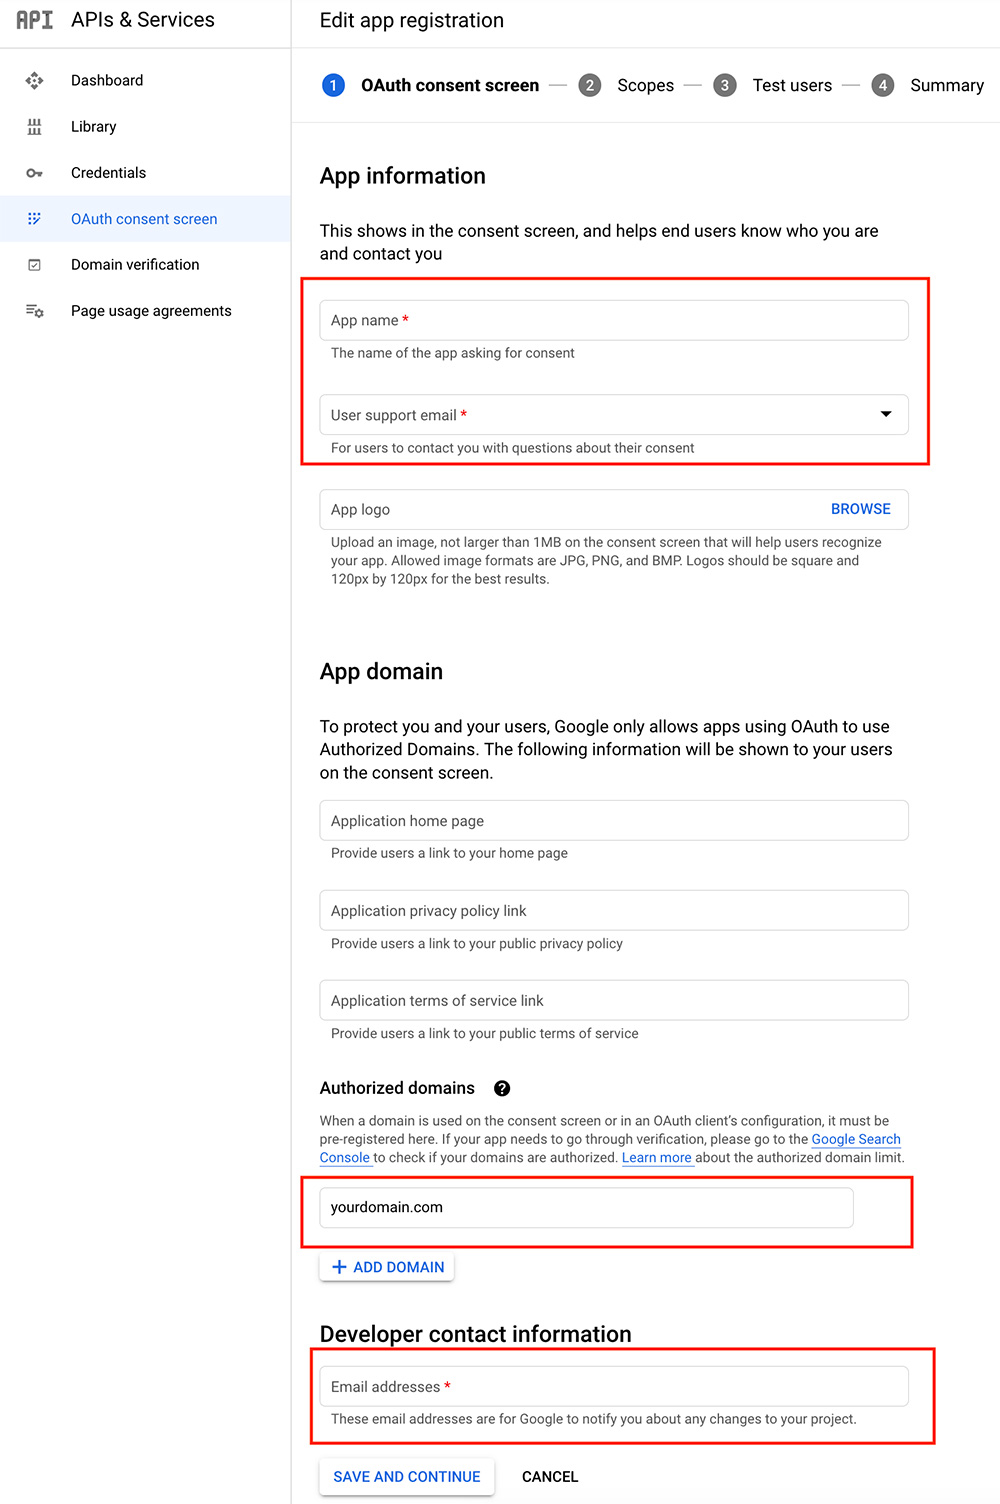
Fill the form and click the "Save and Continue" button.
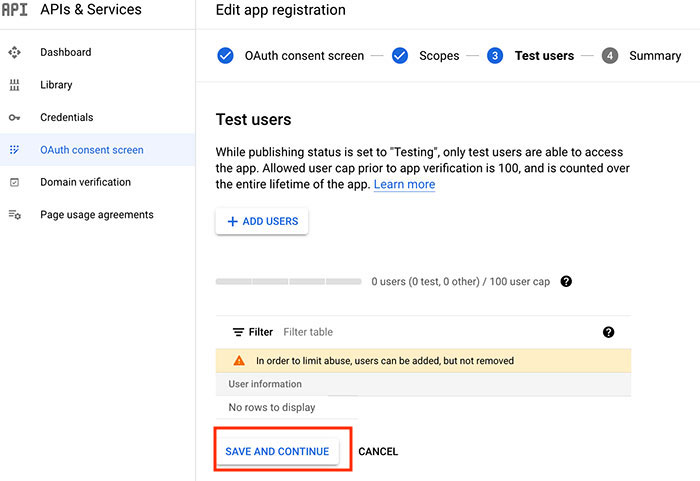
Click the "Add or Remove Scopes" button and select the first 2 options. Click the "Update" button. Then click the "Save and Continue" button.
Click the "Save and Continue" button.
Click the "Back to Dashboard" button on the next page and then click the "Publish App" button.
Click the "Credentials" link from the sidebar menu. Click the "+ Create credentials" option and select the "OAuth client ID" option.
Enter your App name and enter your Google redirect URL to the "Authorized redirect URIs" field.
Google redirect URL: https://domain.com/connect-with-google (Change "domain.com" with your domain name.)
Click the "Create" button.
Copy "Client ID" and "Client Secret" values and enter these values from "Social Login"section in the Admin panel.
Select "Website" option and enter your domain to "Website address" and "Base domain" fields. Click "Connect
Site" button.
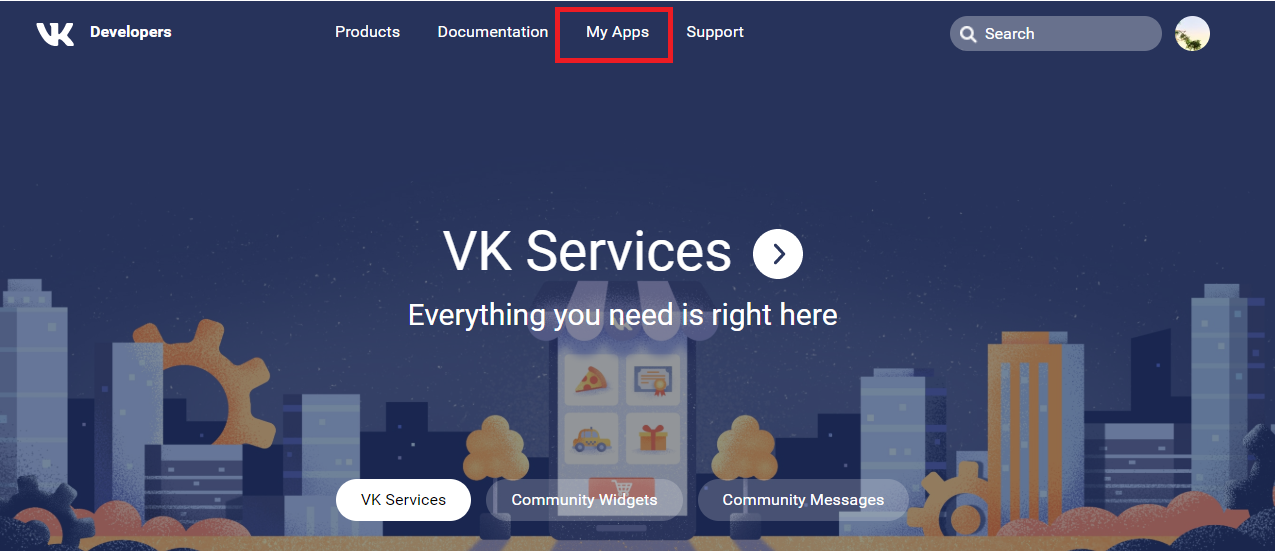
Enter redirect URL to "Authorized redirect URI" field: "https://domain.com/connect-with-vk"
Copy "App ID" and "Secure Key" values and enter these values from "Social Login Configuration"
section.
Storage
You can select your storage option from this section. If you select the "Local Storage" option, uploaded files will be stored in your server.
If you select the "AWS S3 Storage" option, uploaded files will be stored in your AWS S3 account.
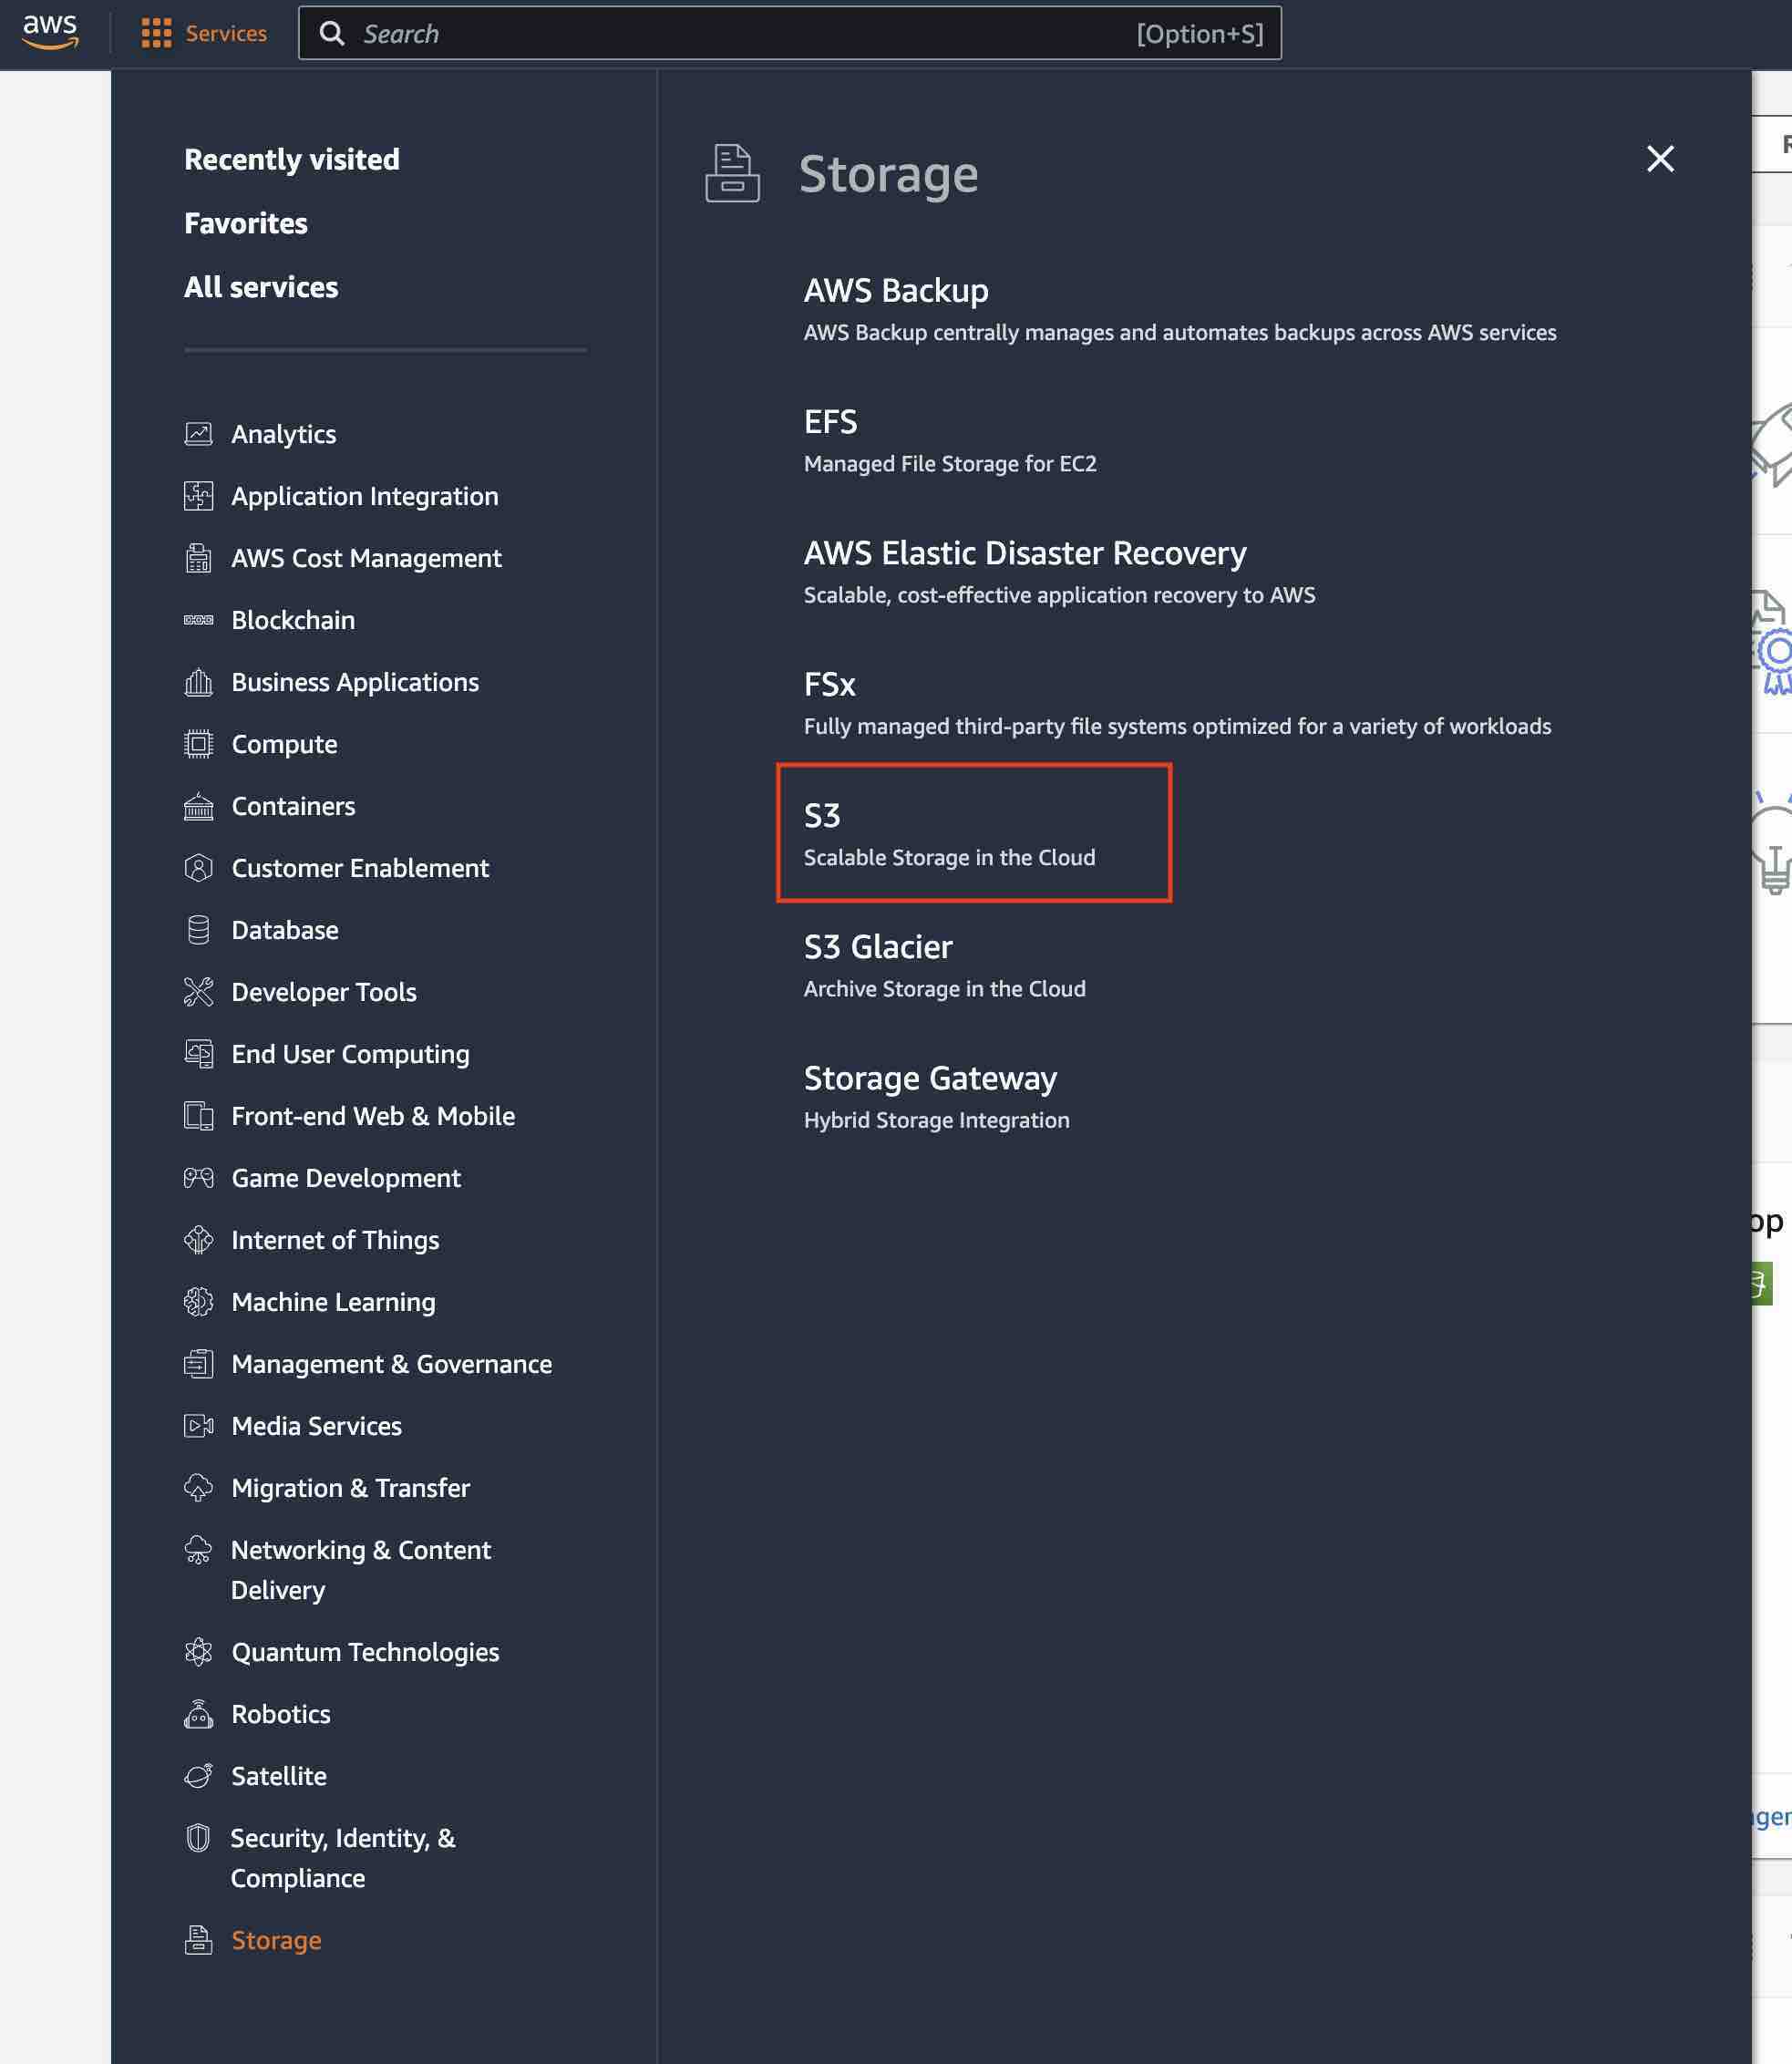
To use AWS S3, you need to follow these steps:
Click the "Services" link from the top menu and then click the "S3" link under the "Storage" section.
Click the "Create bucket" button.
Enter your "bucket name" and select your region. "us-east-1" will be your region code and you need to enter this value from the Admin panel. Your region code can be different according to your location.
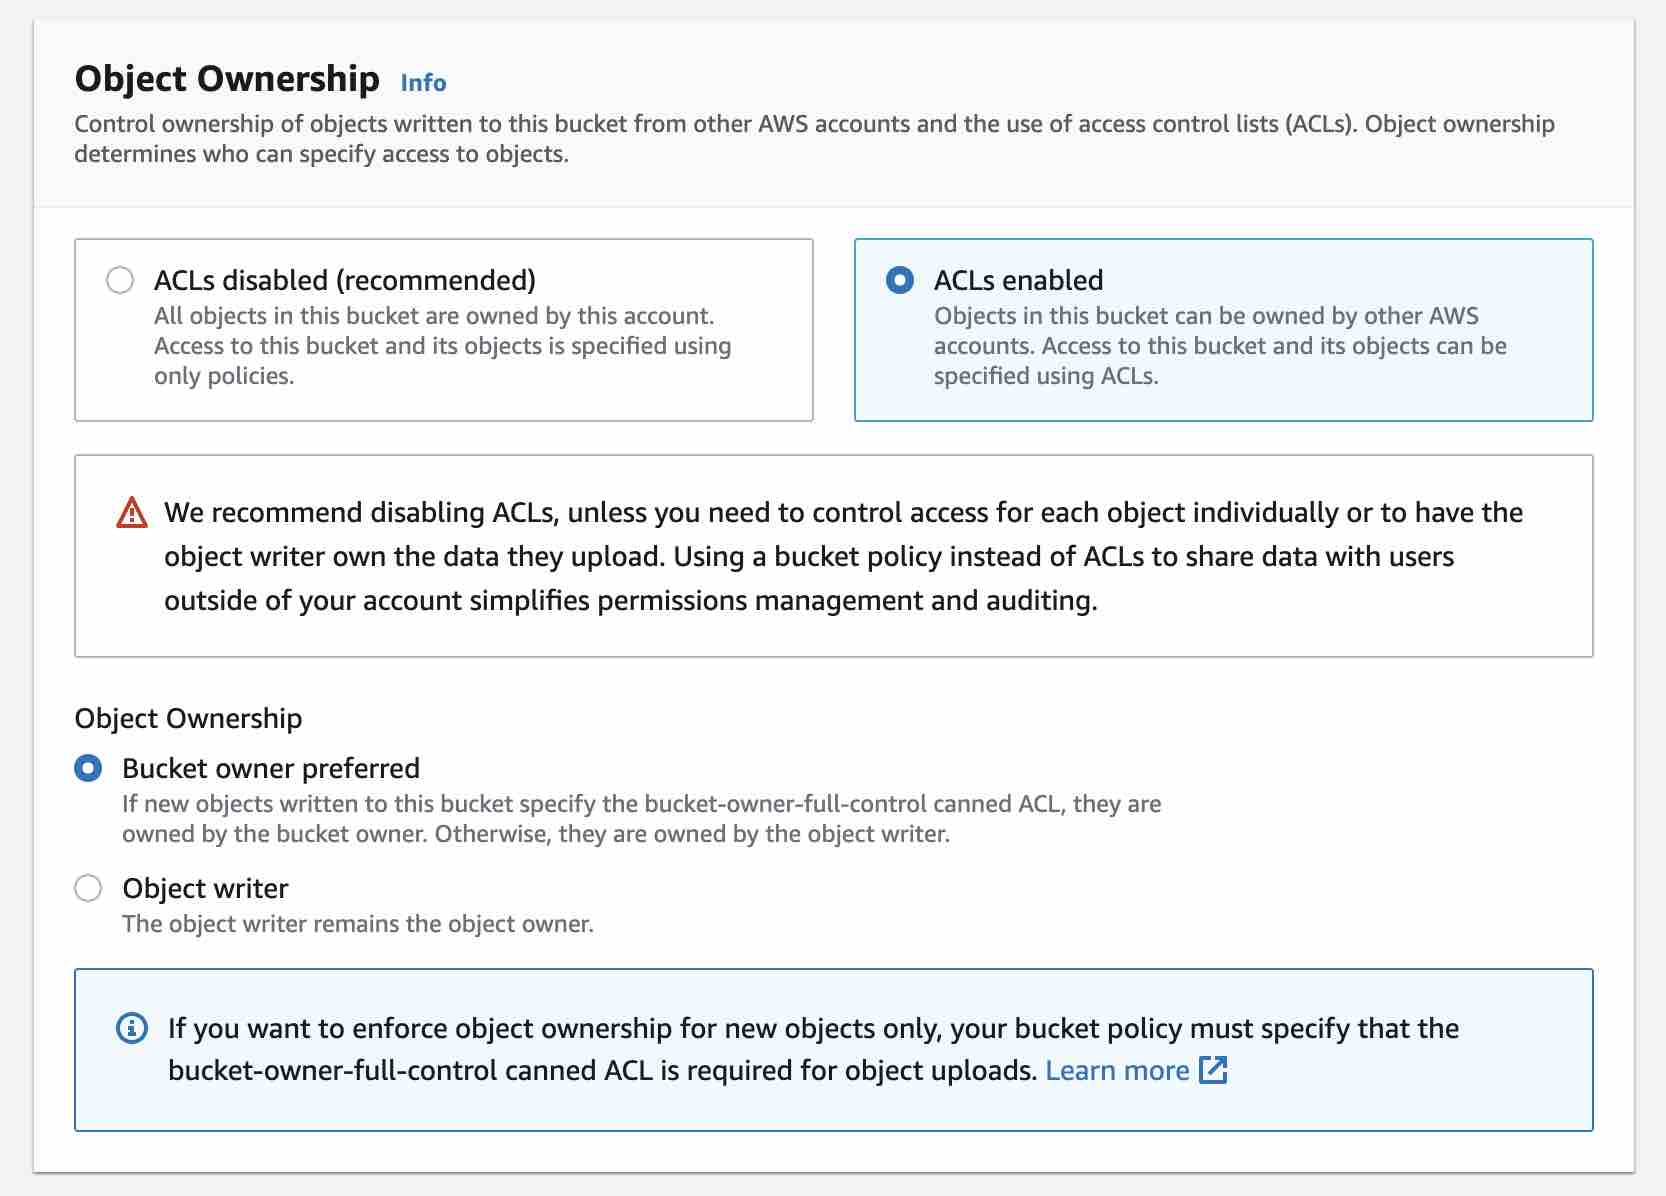
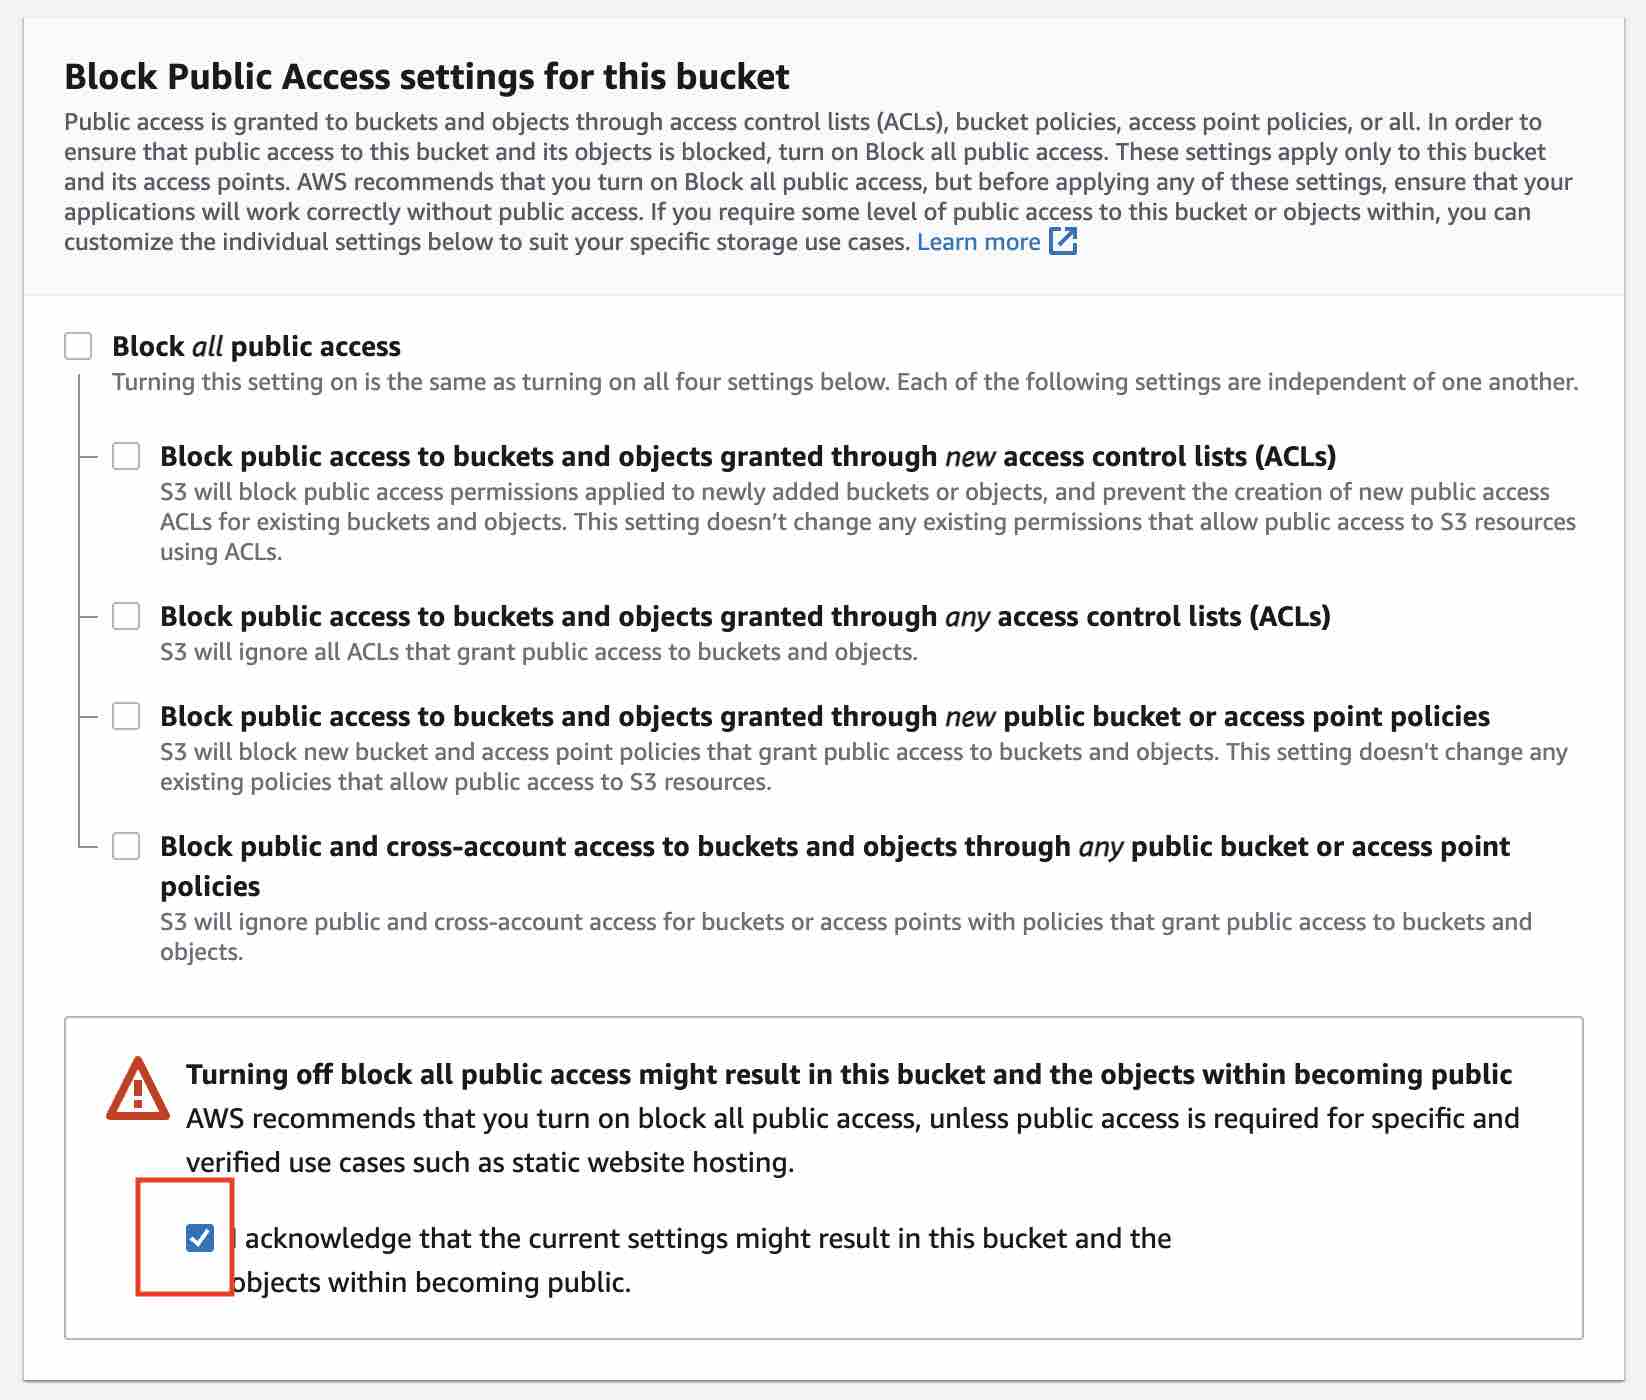
Select the "ACLs enabled" option.
Unselect the "Block all public" option and select "I acknowledge that the..." option.
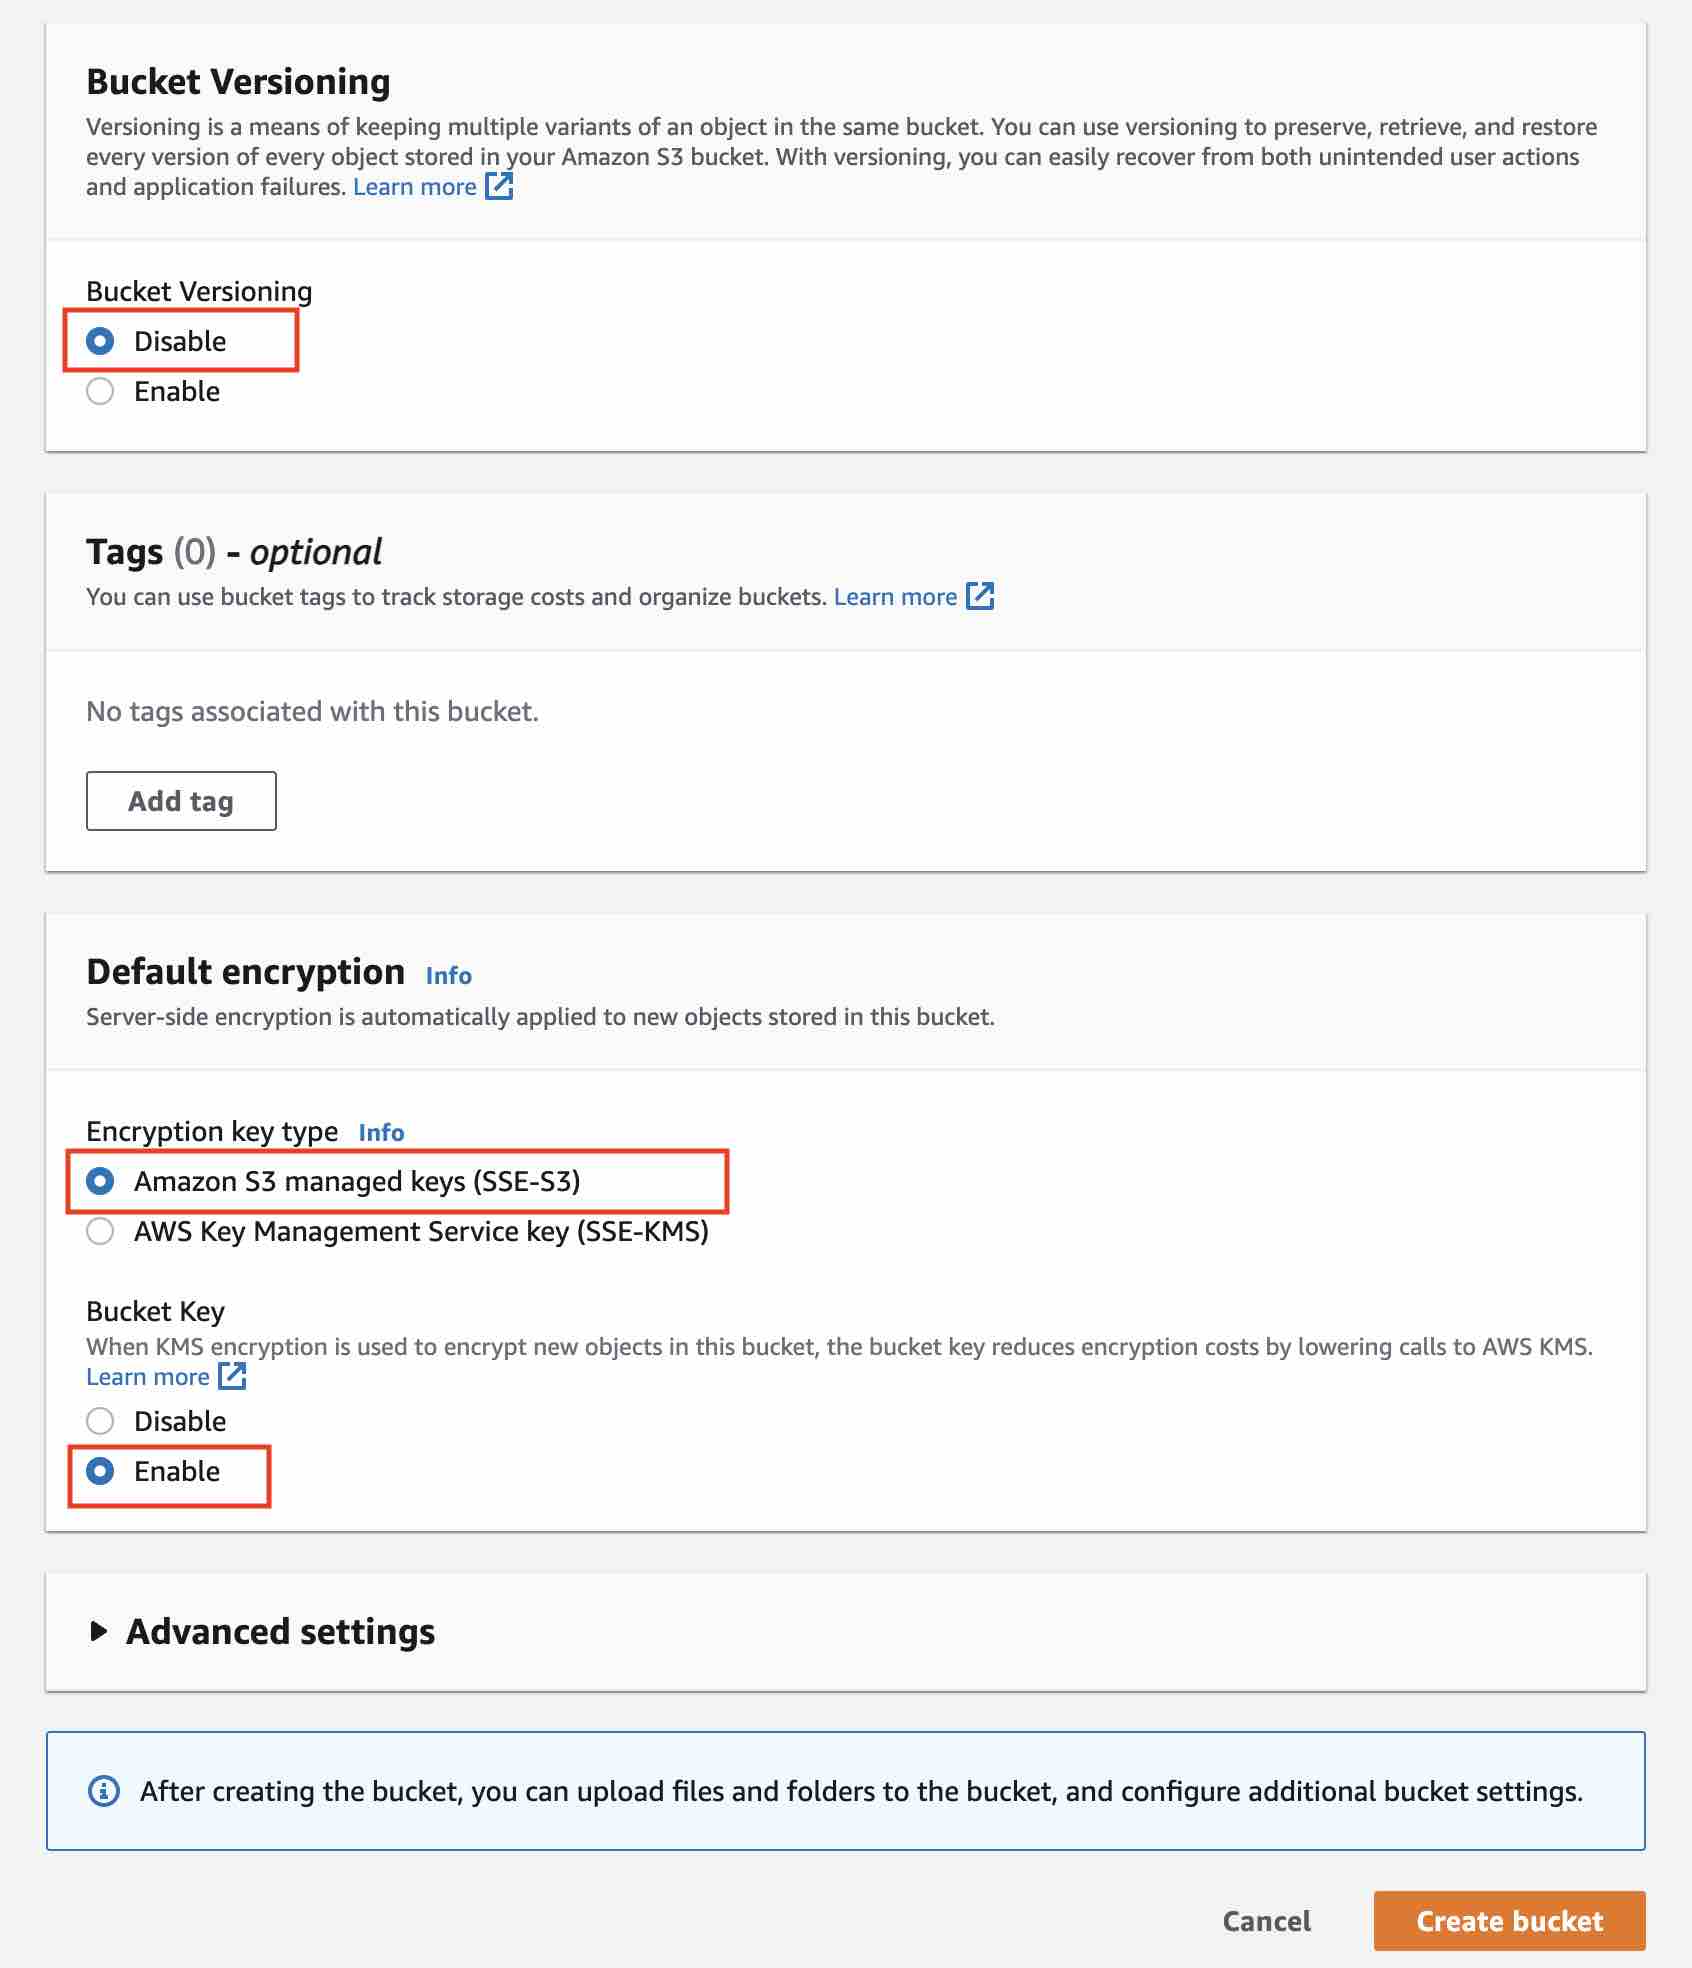
Select these options and Click the "Create bucket" button.
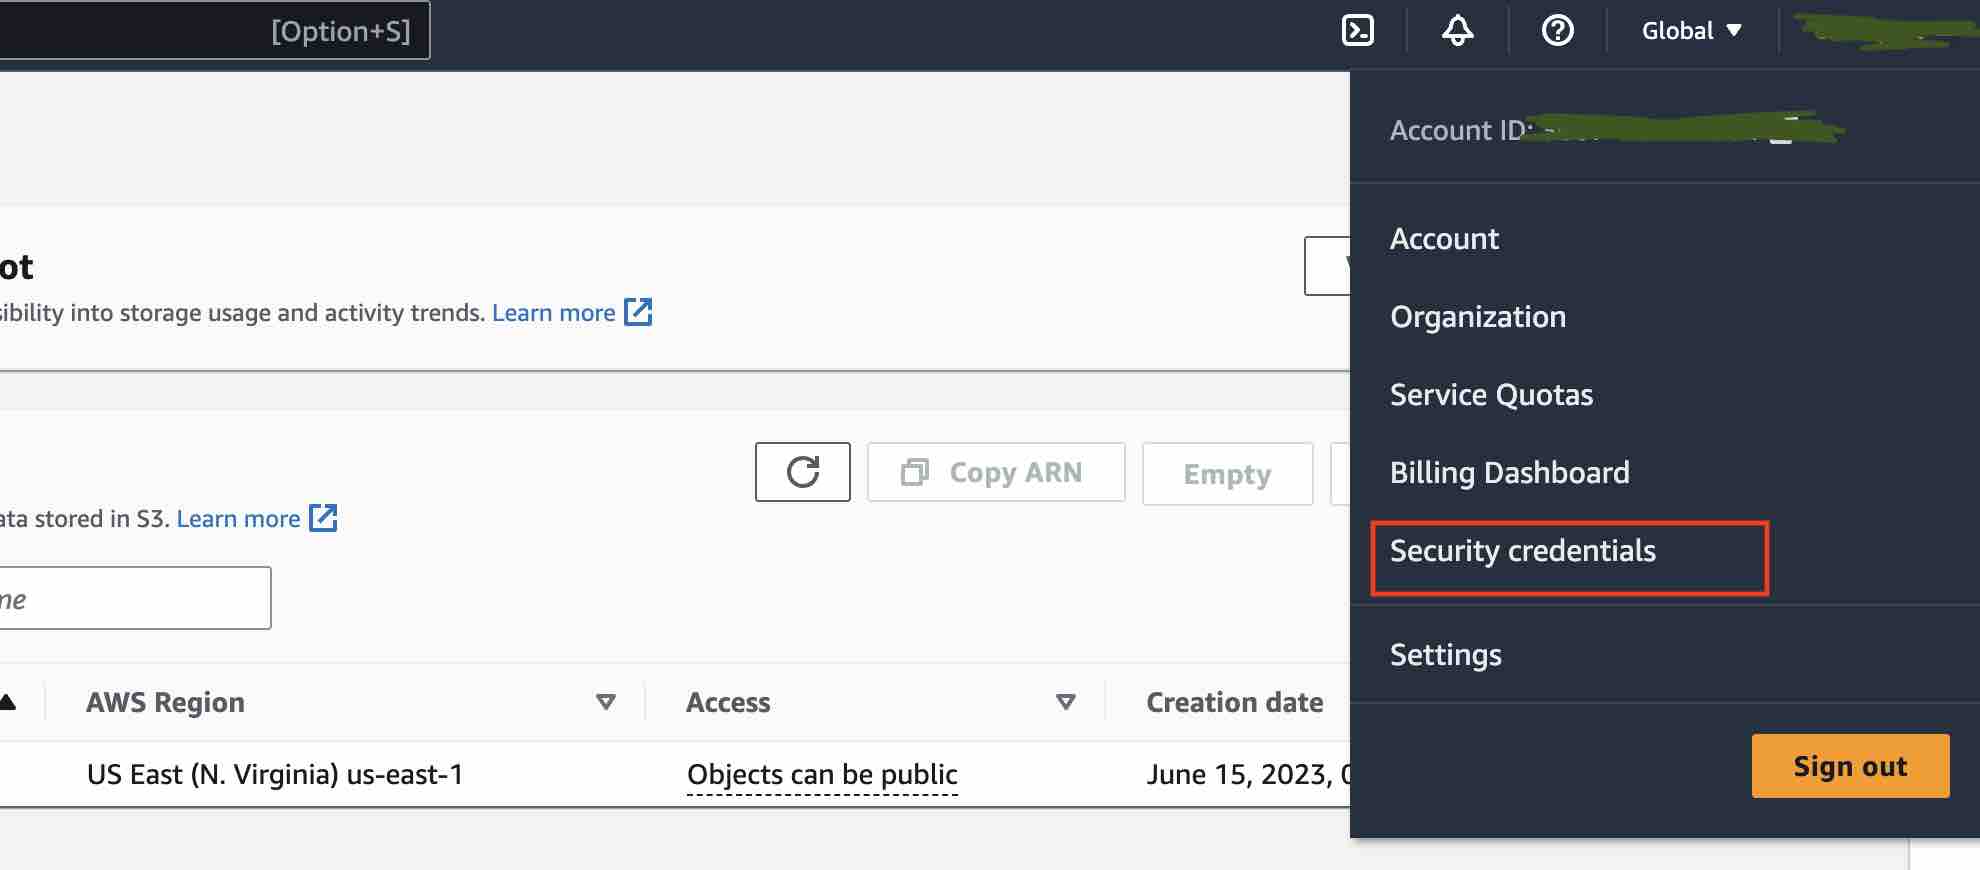
Click the Security Credentials option.
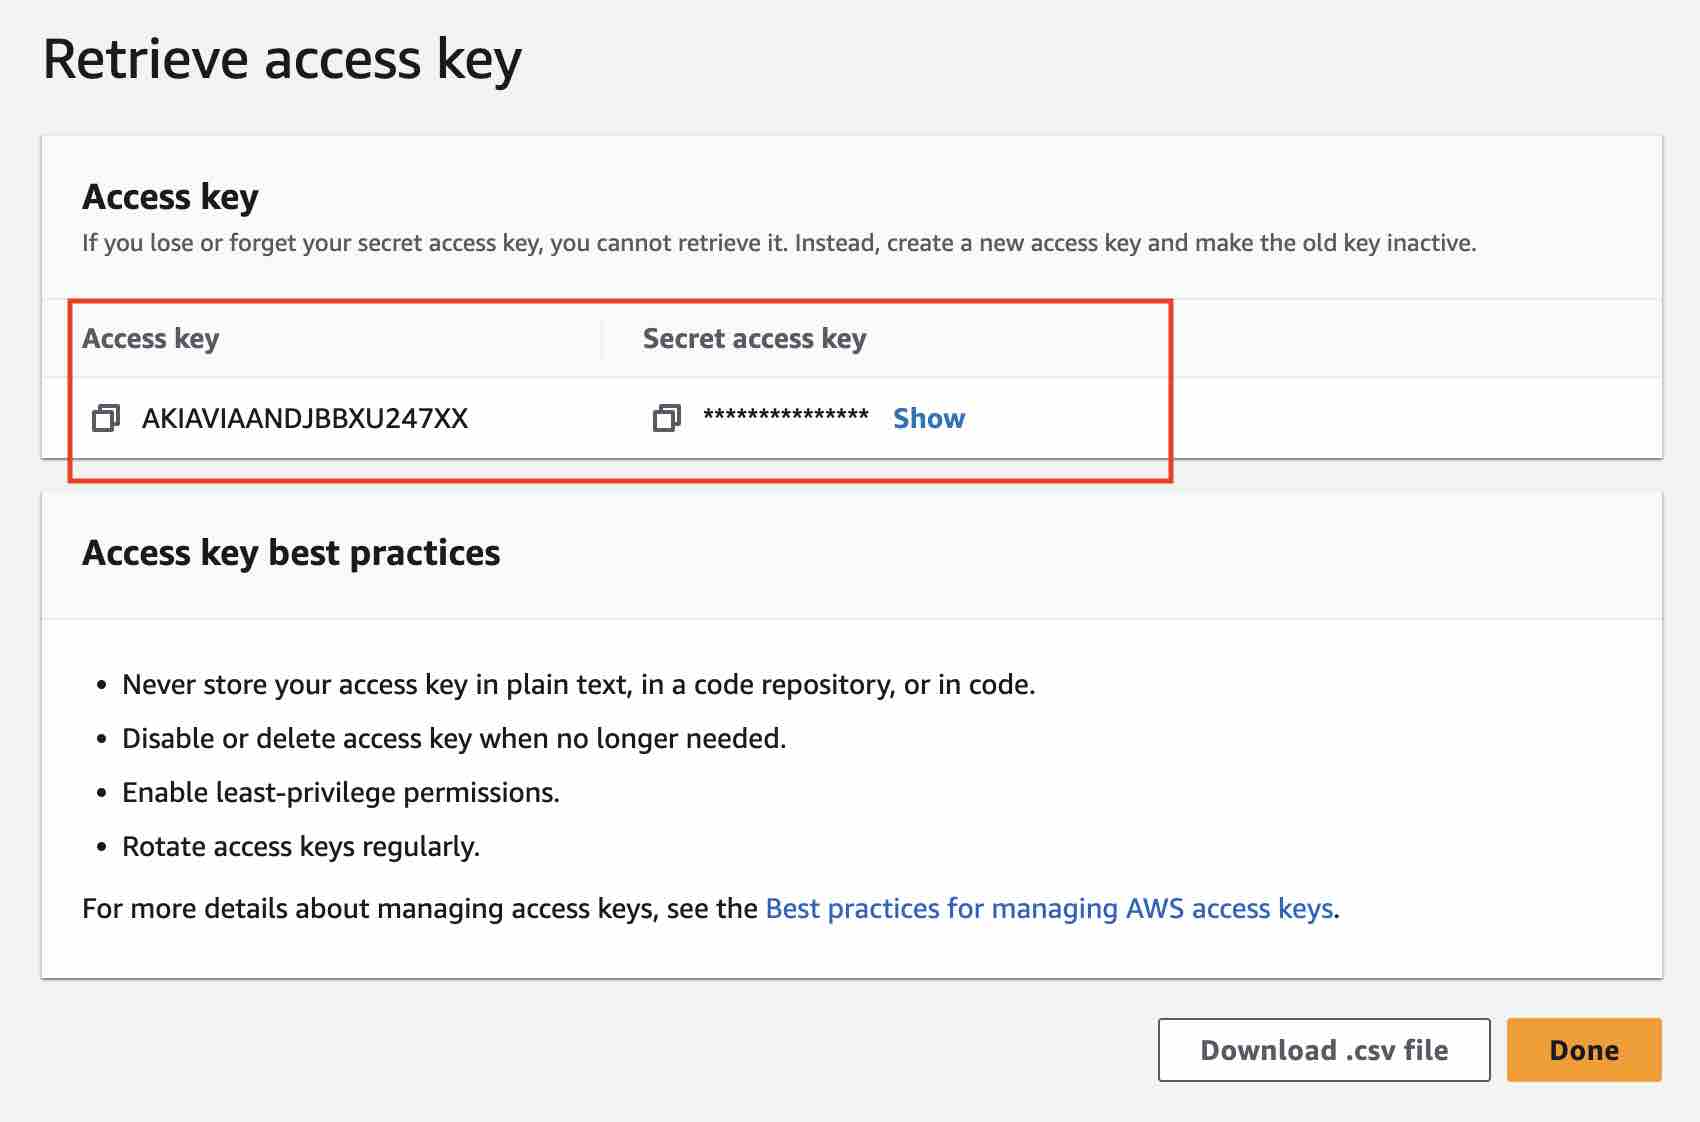
Go to the Access keys section and click the Create Access Key button. and create your access keys.
Select the option and click the Create Access Key button.
Copy your keys and add them from the "Storage / AWS S3 Storage" section in the Admin panel.
Adding Created API Keys from the Admin Panel:
After creating your bucket and your API keys (access key and secret key), you need to go to the Storage section in your Admin panel and add the credentials from the AWS S3 Storage form.
AWS Access Key: Enter the access key that you created. AWS Secret Key: Enter the secret key that you created. Bucket Name: Enter your bucket name. (Example: my-bucket) Region Code: Enter your region code. (Example: us-east-1)
Cache System
You can enable or disable cache system from this section.
Refresh Cache Files When Database Changes: If you select yes, the cache files will be refreshed, if there is a change in the database.
Cache Refresh Time (Minute) : Cache files will automatically refresh after this time.
Google News
Google News is a news aggregator service developed by Google. It presents a continuous flow of links to articles organized from thousands of publishers and magazines.
With this option, you can send the publications of your own website to Google News and increase the number of visitors to your site.
How It Works?
To use Google News, there must be an RSS link for your site's latest feeds. You can generate this feed from the "Generate Feed URL" section. In this section,
you can select different options (language, category etc.) to generate your feed. After selecting the options, you can click on the "Generate Feed URL" button and get the
feed URL. After generating your feed URL, you can submit this to Google News.
To submit your site to Google News, please read the Google documentation: Show up in Google News
**This RSS feed uses cache system and it will be reset every 15 minutes. So an article you add will be added to this feed after the cache is reset.
Cron Job
A cron job is a Linux command for scheduling a task to be executed sometime in the future. You can set a cron job to update your sitemap, scheduled posts or RSS feeds periodically.
Follow these steps to set up cron job:
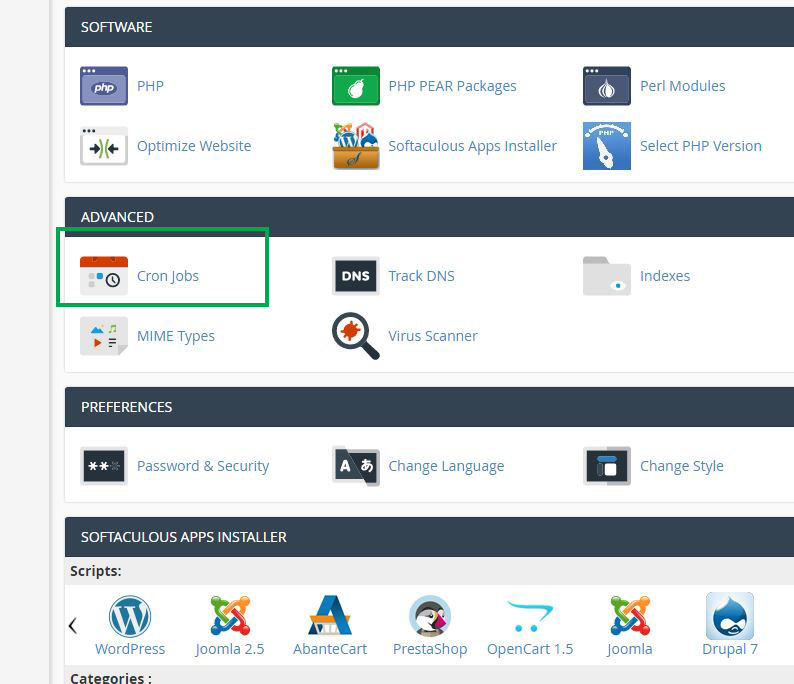
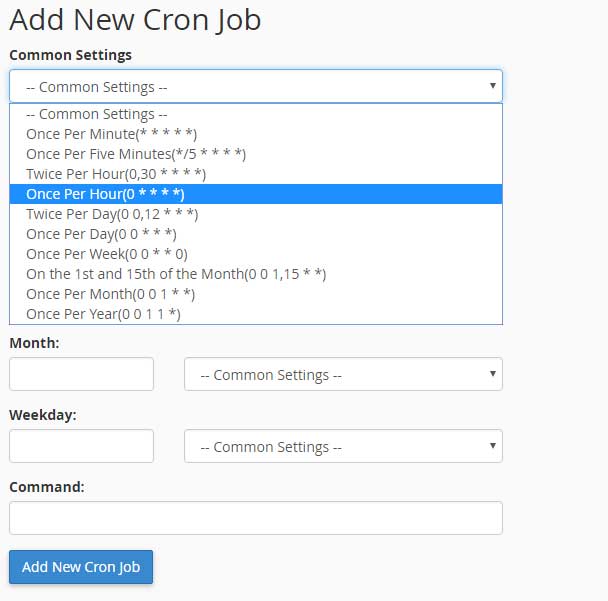
Go to your cPanel and click cron jobs.
Select the time interval that the cron job will run and your command and create the cron job.
You need to paste these commads to "Command" field and you need to create a different cron job for each task. **Do not forget to change "domain.com" with your domain name.
These commands may not work if you do not have a management panel on your server or if you are using another panel instead of cPanel.
Cron job can be added in different ways. If this command doesn't work, you need to contact your server provider and ask for help to create a cron job.
Preferences
You can manage your site settings from this section.
General
Multilingual System: You can enable or disable multilingual system in your site.
Registration System: You can enable or disable registration system in your site.
RSS: You can enable or disable RSS in your site.
RSS Content: By default, the contents of the posts will not be added to the RSS feeds created on your site. Only the descriptions of the posts will be added. If you want to add the content of the posts to the RSS feeds, you can select the "Distribute Post Content" option.
File Manager: Varient is a multi-author system. If you select "Show all Files" for this option, all authors can see all uploaded files. If you select "Show Only Users Own Files", authors will only see their uploaded files. They cannot see files uploaded by other authors.
Audio Download Button: If you want to enabled download option for the audios that you uploaded, you can enable this option.
Show User's Email on Profile: You can hide users email on their profile with this option.
Progressive Web App (PWA): You can enable Progressive Web App (PWA) support with this option.
Homepage
Show Featured Section: You can show or hide featured (slider and the four boxes at the right of the slider) section in your site.
Show Latest Posts on Homepage: You can show or hide latest posts on your homepage.
Show News Ticker: You can show or hide news ticker.
Show Latest Posts on Slider: You can show the last added posts on the slider with this option.
Show Latest Posts on Featured Posts: You can show the last added posts on the featured posts section with this option.
Sort Slider Posts: You can sort slider posts with by date or slider order with this option.
Sort Featured Posts: You can sort featured posts with by date or featured order with this option.
Posts
Comment System: You can enable or disable comment system in your site.
Comment Approval System: You can enable or disable comment approval system with this option. If you disable this system, the comments will be directly displayed in your site.
Facebook Comments: You can enable or disable Facebook comments in your site.
Emoji Reactions: You can enable or disable emoji reactions in your site.
Show Post Author: You can show or hide post author.
Show Post Date: You can show or hide post date.
Show Post View Count: You can show or hide post page view count (number of pageviews for posts).
Approve Added User Posts: If you enable this option, new added users posts will require approval.
Approve Updated User Posts: If you enable this option, updated users posts will require approval.
Redirect RSS Posts to the Original Site: This option allows you to directly redirect to the source site when the links are clicked for the posts added to your site with an RSS feed.
So if you enable this option, the visitors will be redirected to the original site when they click to read a post.
Number of Posts Per Page (Pagination): You can set post count in each page from this field.
Post Formats
You can enable or disable post formats from this section.
Auto Post Deletion
This system allows you to delete your old posts automatically. For example, if you enable this system and set the "Number of Days" value to 30, the system will delete the articles added before 30 days.
If you want to delete only the RSS posts, you can select the "Delete only RSS Posts" option.
This system will NOT run automatically. It will run when you log in to the Admin panel. And as long as you are active in the Admin panel, it will continue to work automatically every 1 hour.
File Upload
Image File Format: Uploaded images will be converted to the selected image format. You can choose the format you want with this option.
Allowed File Extensions: Hackers often hack websites by uploading some files. To prevent such security issues, the system allows only allowed file types to be uploaded.
You can add the extensions of the file types you want to be uploaded to your site from this field.
We do not recommend you to add files extensions that can create security problems. Example, PHP, PY, ASP, JSP, SH, JS etc.
Progressive Web Apps (PWA)
A Progressive Web Application (PWA) is a type of application delivered through the web, built using common web technologies including HTML, CSS and JavaScript. It is intended to work on any platform that uses a standards-compliant browser.
If you enable PWA support for your site, you can add your site to your home screen of your mobile device. You will see your application icon of your site on your mobile devices and it will work like a mobile application when you open it.
Enabling PWA for Your Site
Make sure SSL is active on your site.
Go to Preferences section from Admin panel and select "Enable" for "Progressive Web App (PWA)" option.
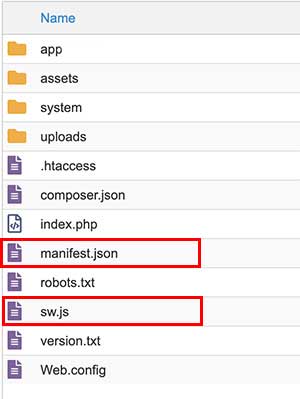
Open this .zip file and upload "manifest.json" and "pwa-sw.js" to root directory of your site.
Open "manifest.json" file and edit this file for your site. Change the texts in this file (name, description, short_name) for your site and replace "https://domain.com" with your domain. Example: https://codingest.com
Also, you can change "ltr" to "rtl" if your language is "right to left".
If you want to change your application icon, you can change the images in the "assets/img/pwa" folder.
Adding Application Icon to the Home Screen of the Mobile Device
After enabling PWA, you will see an "+Add to Home Screen" option when you open your site with an Adroid device. If you open your site with iPhone (Safari), you can see this option in the options menu of the browser.
Route Settings
You can change static routes in your site from this section.
You cannot use invalid & special characters in the routes. The system will remove the invalid character when you click the save changes button.
Email Settings
To send emails, you must create a mail account on your server and you must enter your email account credentials to these fields:
Mail Service: Varient has Swift Mailer and PHP Mailer email libraries. It also has Mailjet API option. You can select one of them to send emails.
Mail Protocol: SMTP or Mail. Default: SMTP. But some mail servers use Mail protocol. In this case you should use Mail protocol.
Encryption: TLS or SSL. Default: TLS. If your server does not support sending with SSL, you should choose TLS.
Mail Host: Your mail server (E.g: mail.example.com)
Mail Port: Your mail port. Default: 587
Mail Username: Your username (E.g: mail@example.com)
Mail Password: Your password
Mail Title: Your email title
Reply-To: If recipients reply to your e-mail, the reply will go to this e-mail address.
Mailjet Email Service
Mailjet is an Email service that gives 200 free emails per day. You can easily use this system by creating a free account on the Mailjet site.
Go to "Email Settings" section in the Admin panel and select the "Mailjet" as the "Mail Service" option. Then add your API Key, Secret Key and Mailjet Email Address.
**In the Mailjet Email Address field, you must enter the email address you registered with the Mailjet site.
Mail Protocol
Mail protocol allows you to use the default PHP mail function and allows you to send email without any extra settings. But this function is disabled on most servers for security reasons.
If this function is active on your server, you can select the Mail protocol and use it without making any other settings.
Example:
Mail Protocol: Mail
Mail Title: Varient
Reply-To: noreply@domain.com
SMTP Protocol
If the Mail protocol is not working on your server, you need to use the SMTP protocol. You need a mail server for using SMTP protocol. You can use your own server or Amazon SES as your mail server.
1. Using Your Own Server
If you want to use the mail service of your own server, you can create a mail account on your server and make the necessary settings with this account.
To do this, you need to create a mail account on your server and know which protocol and port values your server uses.
If you can't see these values from your server's management panel, you can ask help from your server provider.
Example:
Mail Protocol: SMTP
Mail Library: Swift Mailer or PHP Mailer
Encryption: TLS
Mail Host: smtp.domain.com
Mail Port: 587
Mail Username: info@domain.com
Mail Password: 1234
Mail Title: Varient
Reply-To: noreply@domain.com
2. Using Amazon Simple E-mail Service (SES)
Amazon SES is a cloud-based email sending service. You can create your Amazon SES account and send emails with this service.
This is not a free service, check this page for pricing: https://aws.amazon.com/ses/pricing/
If you want to use this service, follow these steps to make your email settings:
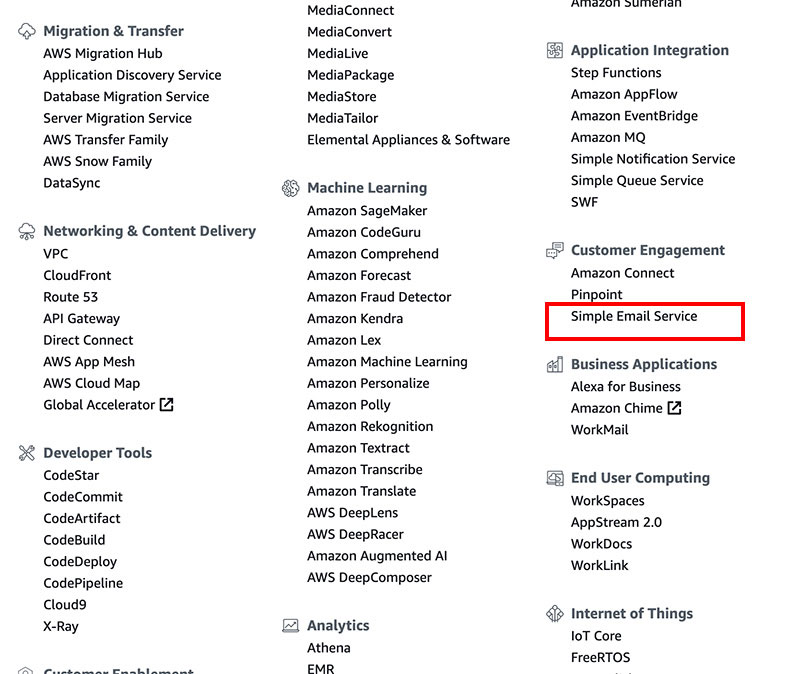
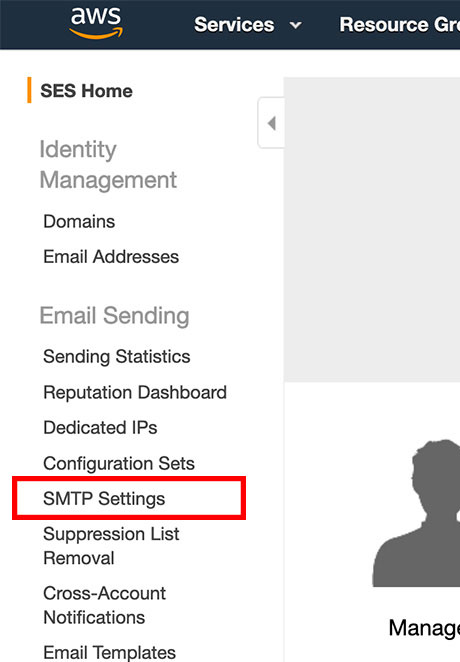
Click the "Simple Email Service" link under the Services menu
Click the "SMTP Settings" link from left menu.
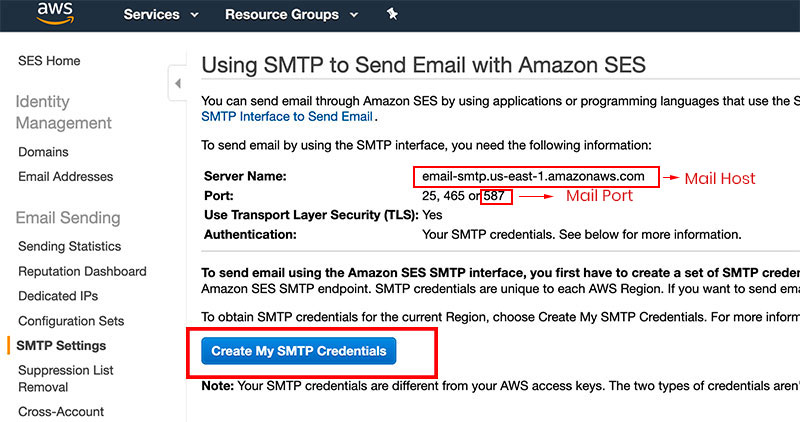
Click the "Create My SMTP Credentials" button.
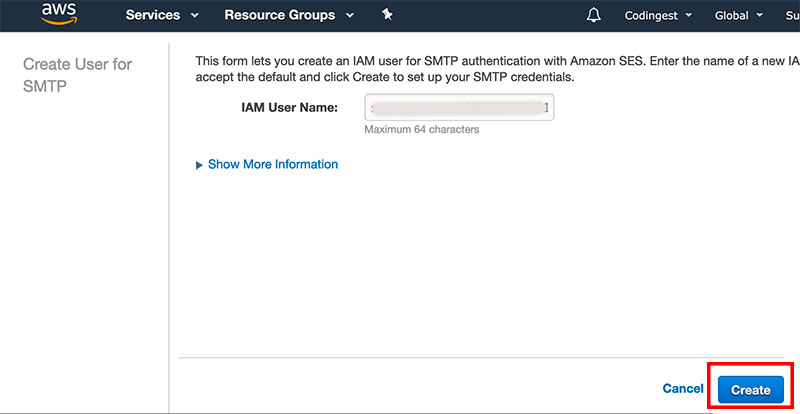
Click the "Create" button.
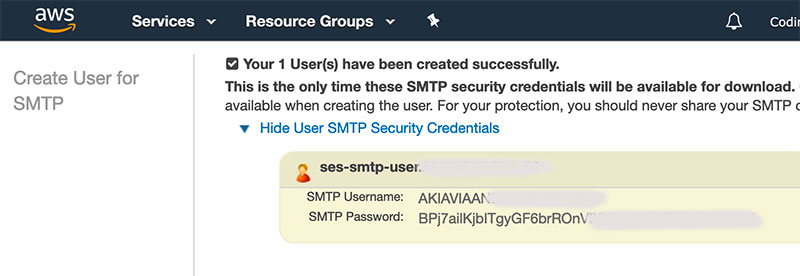
Your credentials will be created after these steps.
After creating your credentials, you can add these credentials from Email Settings in the Admin panel.
Example:
Mail Protocol: SMTP
Mail Library: Swift Mailer or PHP Mailer
Encryption: TLS
Mail Host: email-smtp.us-east-1.amazonaws.com
Mail Port: 587
Mail Username: AKIAVIAANDJBBXXXXXXX
Mail Password: BPj7ailKjbITgyGF6brROnVIflfdfdydbdklsdsds
Reply-To: noreply@domain.com
If you are using Amazon SES in test mode, you need to verify the email address to which you will send a test mail and the email address that you add for the "Reply-To" field. To do this, click the Email Addresses link from the left navigation and verify the receiver email address in this section.
Sending email via Gmail will no longer be supported by us. The reason for this is that the security changes made by Google prevent the sending of emails. Sometimes, even after making the necessary settings, Gmail does not allow sending email on some servers.
You can use the Gmail server if it is working on your server, but our support team will not help with this.
Email Verification: You can enable or disable email verification from this section.
Contact Messages : If you want to send contact messages to your email address, you can select "Yes" for "Send Contact Messages to Email Address" option by adding your email address.
Font Settings
You can change your site fonts from this section.
Add Font
If you want to add new fonts to your site, you can add them from this section. Follow these steps to add a new font:
Click the red plus icon for the font that you want to add.
You will see "Family Selected" box at the right bottom of the page. Click on this box.
Copy the font URL and enter it to "URL" field.
E.g: <link href="https://fonts.googleapis.com/css?family=Open+Sans&display=swap" rel="stylesheet">
Copy the CSS rule and enter it to "Font Family" field.
E.g: font-family: 'Open Sans', sans-serif;
Language Settings
You can manage your languages from this section.
Set As Default: You can set your default language with this option.
Edit Translations: After adding a language, you can click this button and translate all texts in the script in to your language.
Export: This option allows you to download your language. It will downloaded in JSON format and you can import it to your another website. Or you can use it as a backup of your language.
Add Language
You can add your new language from this section.
Import Language
If you have a JSON language file, you can import it from this section.
Genaral Settings
Genaral Settings
Timezone: You can set your timezone from this field.
Cookie Prefix: This a prefix that will be added to every cookie variable on your site and it will prevent collisions.
Application Name: Your site name.
Footer About Section: About your site. This will be shown in the footer.
Post Optional Url Button Name: You can set a new name for your optional button.
Copyright: You can update copyright section from here.
Contact Settings
Address: Your address
Email: Your email address
Phone: Your phone number
Contact Text: You can add some text about contact.
Social Media Settings
You can add your social links from this section.
Facebook Comments
If you want to use Facebook comment plugin you have to add your plugin code to this section.
Select "reCAPTCHA s2" and "I'm not a robot Checkbox" options and generate your API keys.
Maintenance Mode
If you want to prepere your site before going live or if you want to close your site to visitors, you can enable this mode. If you enable it, only Admin can access the site.
Other visitors will see a "Coming Soon!" text.
Update Guide
You can find all instructions to update your site in this section. If you don't know your current version, you can check it from the version.txt file in the main directory of your site.
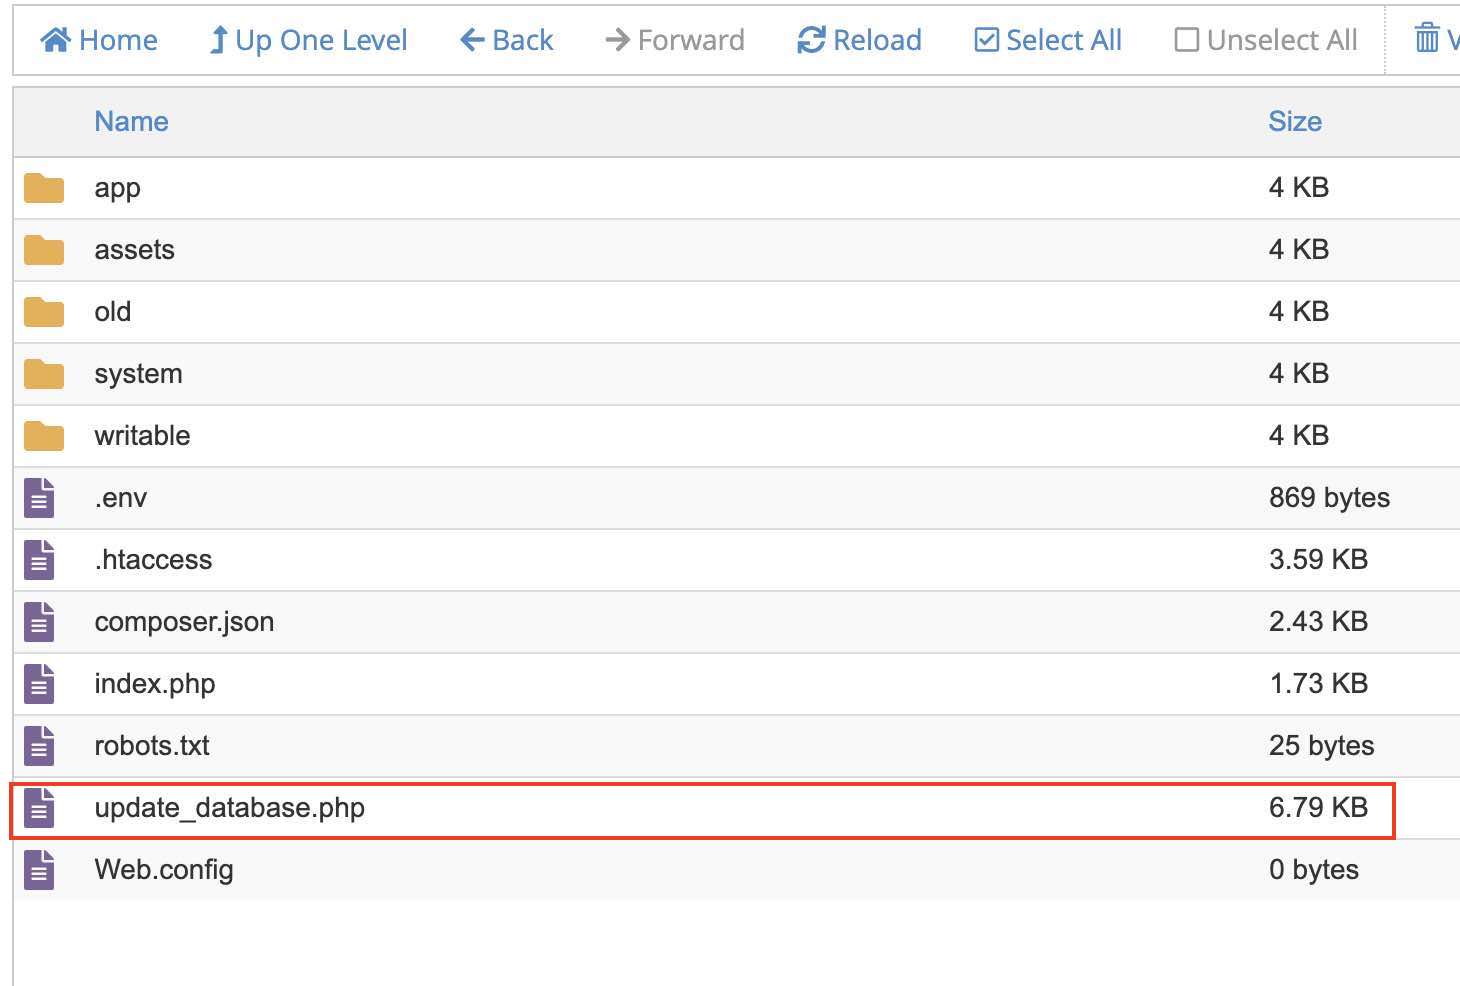
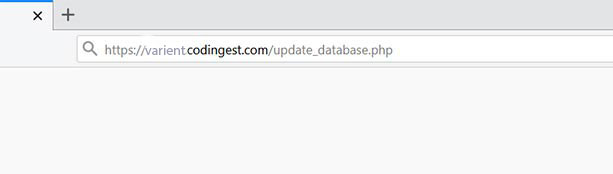
Follow all steps in the Updating Database (Click Here) section. You can find update_database.php file in the "documentation/updates/Update from v2.1.x to v2.2" folder.
Clear your browser cache. This is important. If you do not clear, your browser may continue to run old codes.
Follow all steps in the Updating Database (Click Here) section. You can find update_database.php file in the "documentation/updates/Update from v2.0.x to v2.2" folder.
Clear your browser cache. This is important. If you do not clear, your browser may continue to run old codes.
Follow all steps in the Updating Database (Click Here) section. You can find update_database.php file in the "documentation/updates/Update from v1.9.x to v2.2" folder.
Clear your browser cache. This is important. If you do not clear, your browser may continue to run old codes.
Follow all steps in the Updating Database (Click Here) section. You can find update_database.php file in the "documentation/updates/Update from v1.8.x to v2.2" folder.
Clear your browser cache. This is important. If you do not clear, your browser may continue to run old codes.
Updating FTP Files
Open your cPanel and go to File Manager section.
Go to main directory of your site.
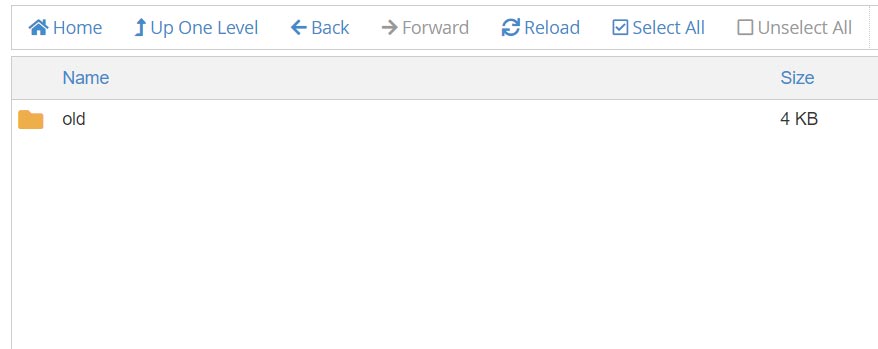
Create a new folder named "old".
Move all of your files to this folder.
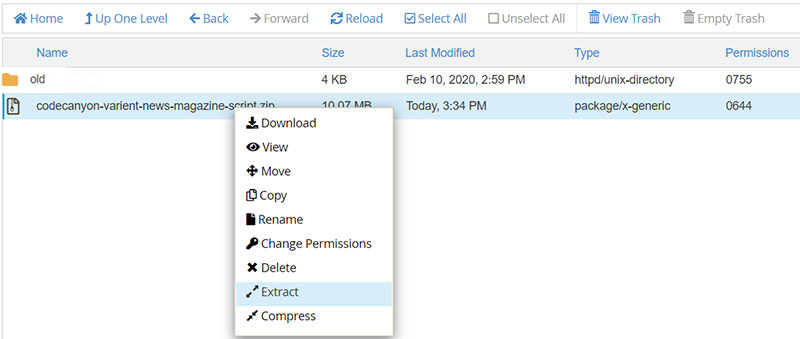
Upload "codecanyon-varient-news-magazine-script.zip" file to this directory.
Rigth click the .zip file and select "Extract" option.
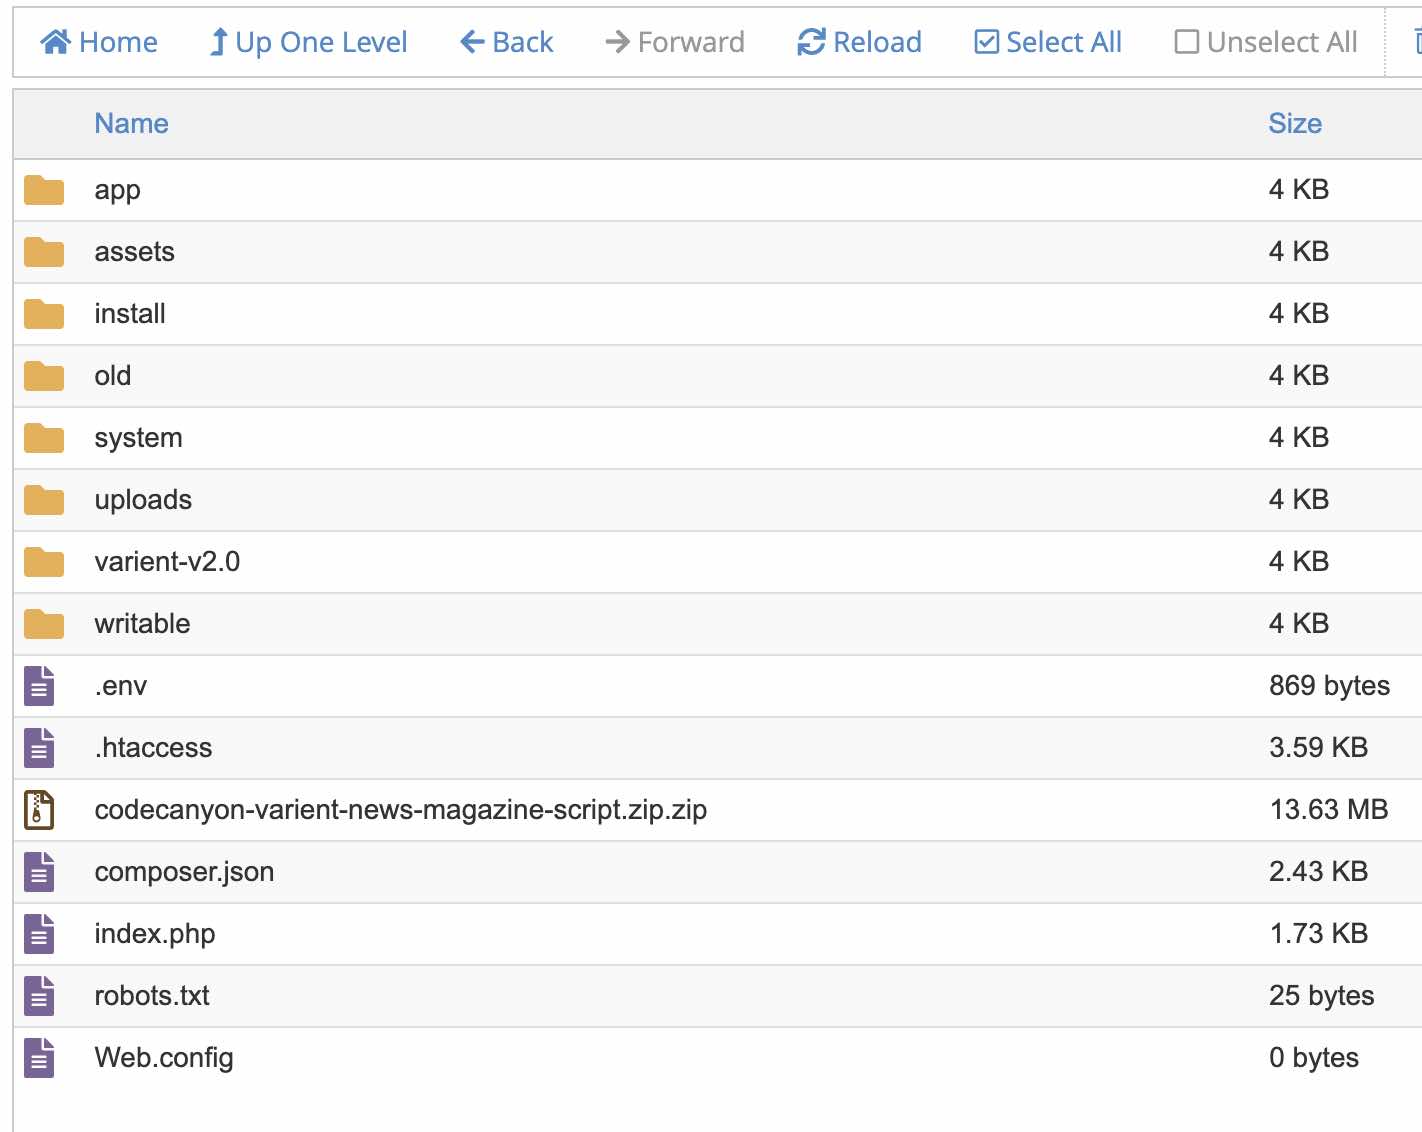
Move all files that in the "varient-v.." folder to main directory.
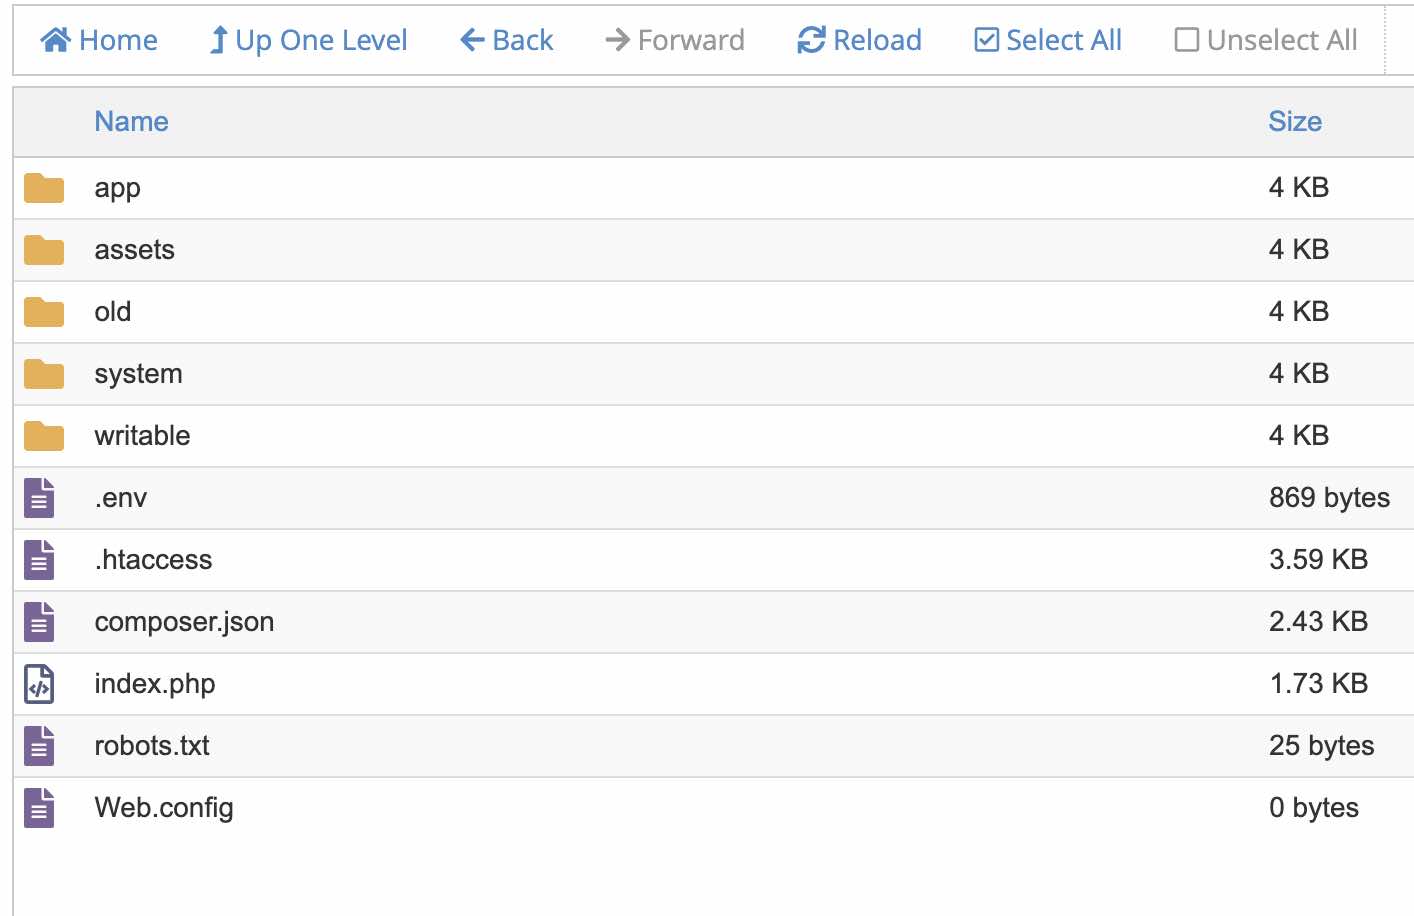
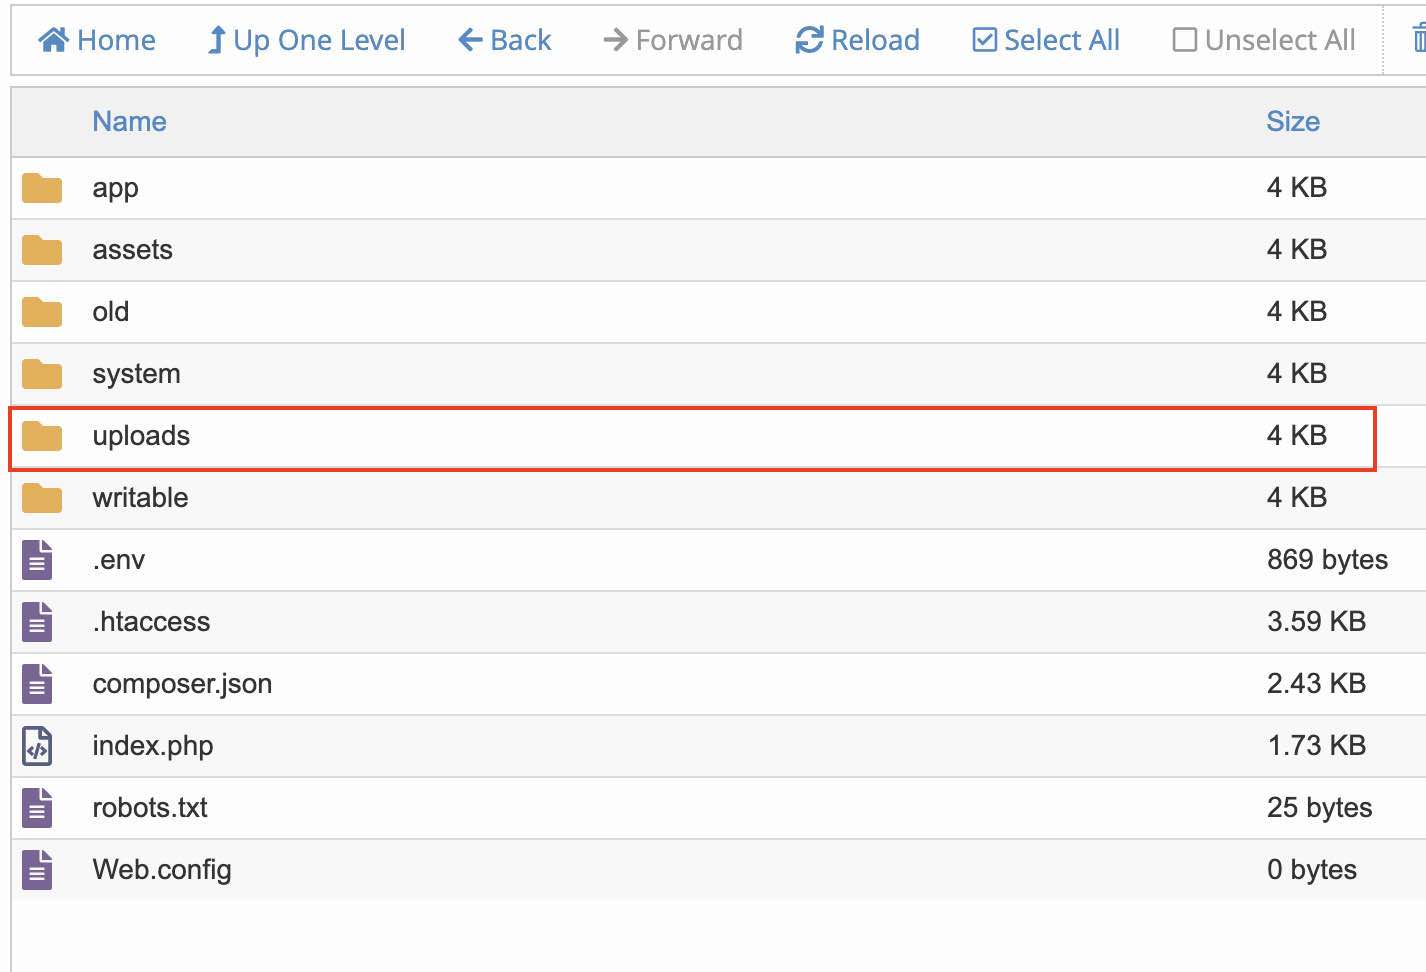
Delete unnecessary files/folders: "documentation", "uploads", "varient-v..", "install" and "codecanyon-varient-news-magazine-script.zip".
Copy old/uploads folder to main directory.
Open app/Config/Database.php file and enter your database credentials.
Open ".env" file that on the main directory of the script files and add your license and your site URL.


Comments
Varient has comment approval system. Only approved comments will be published in the site. If you want to disable this system and publish directly all the comments, you can disable this system from "Preferences" section in the Admin panel.
Pending Comments
You can see and approve the pending comments from this section.
Approved Comments
You can see and delete the approved comments from this section.